<![CDATA[grack.com]]>https://grack.com/resource/favicon/favicon-160x160.pnghttps://grack.com/resource/favicon/favicon-160x160.png2026-06-27T17:59:52+00:00https://grack.com/Jekyll<![CDATA[Anatomy of a Failed (Nation-State?) Attack]]>2026-06-25T00:00:00+00:00https://grack.com/blog/2026/06/25/dissecting-a-failed-nation-state-attack
Disclosures
🧠 This post is fully human-written: all prose with the exception of the IoC information. Because it was time-sensitive, Claude was used to accelerate the RAT analysis and build an IoC-detection script.
As I live in Canada, this information was reported to the appropriate Canadian agencies (CCCS et al). The payload-laden image does not trigger any AV engines on VirusTotal.
The attacker’s identity is fictitious, but there are uninvolved individuals with the same name that they may be confused for and have been omitted from this piece.
On Reddit there’s a few others in the Rust community who mentioned they were targeted as well.
This week I came in far-to-close contact with a fake-interview scam designed to backdoor my machine, and from the context of the emails, I assume my packages on crates.io.
Note: I’m calling it the “PinpinRAT” because of some of the internal strings, but it’s possible this has another name out there. I couldn’t find any other references to it online.
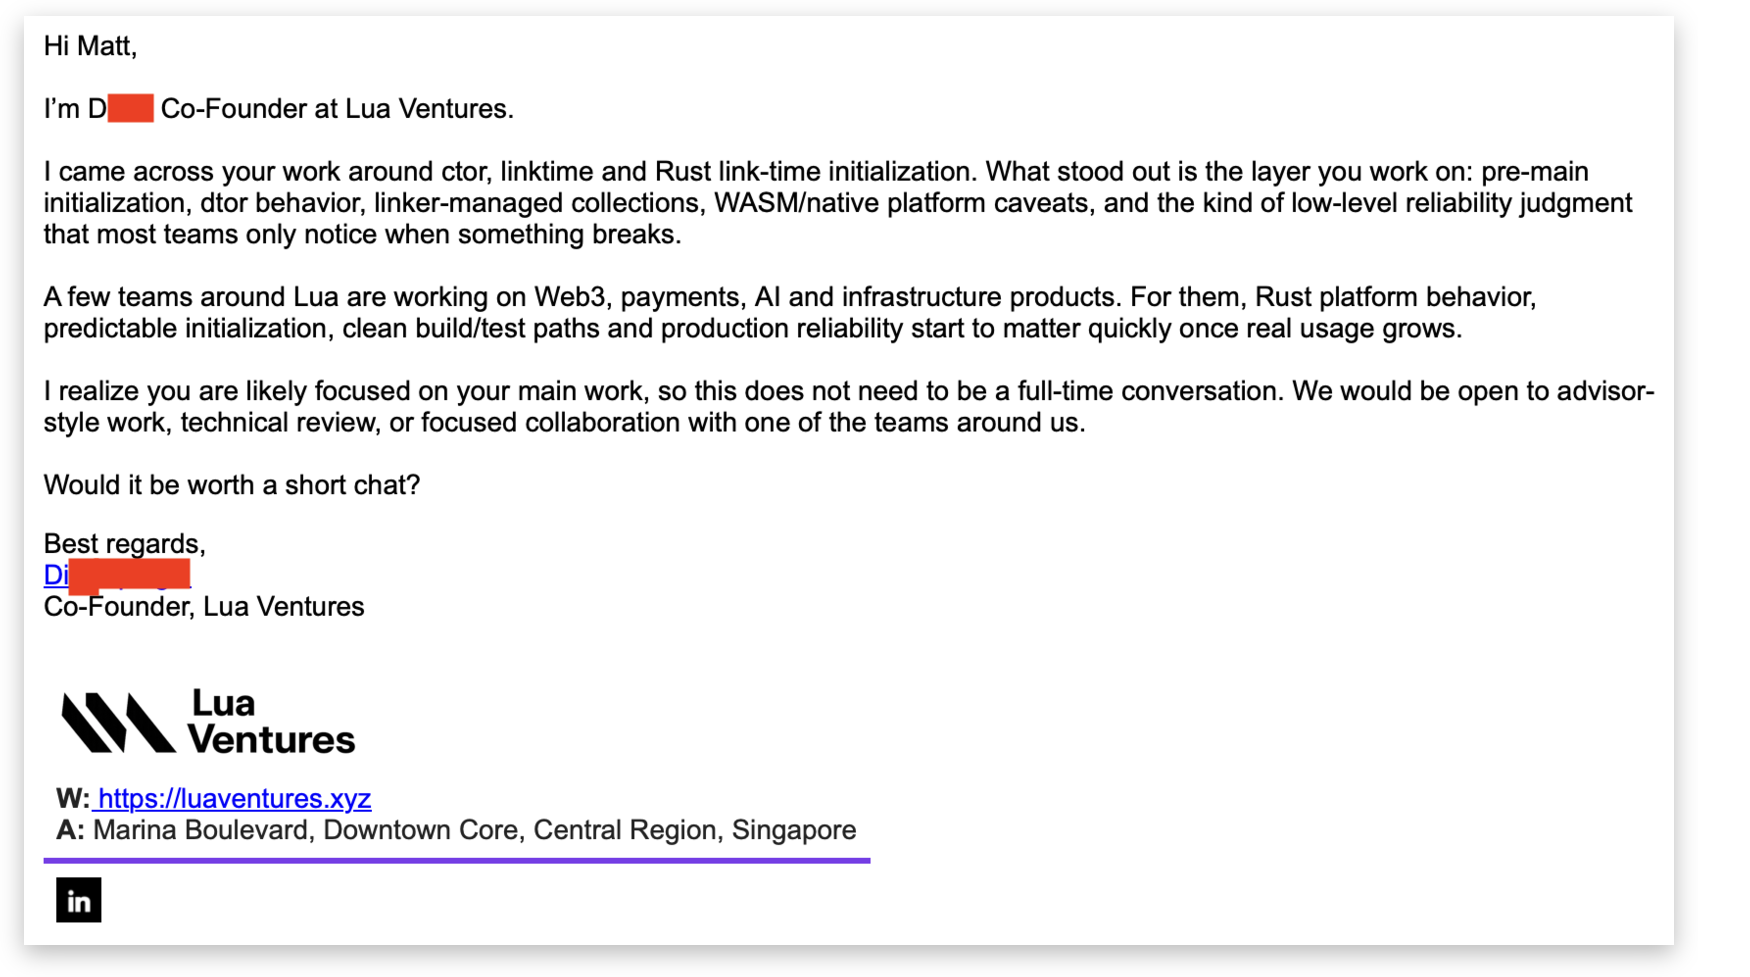
A week and a half ago I received an email from “D█████ S████” claiming to be from Lua Ventures, a (unbeknownst to me at the time) defunct Singapore-based VC in the DeFi space. To be clear: this is a fabricated persona, and the name was likely chosen to be easily mistaken for one of a number of real people with the name.
It looked like a real email, including a link to a somewhat boring, but legitimate-looking LinkedIn profile.
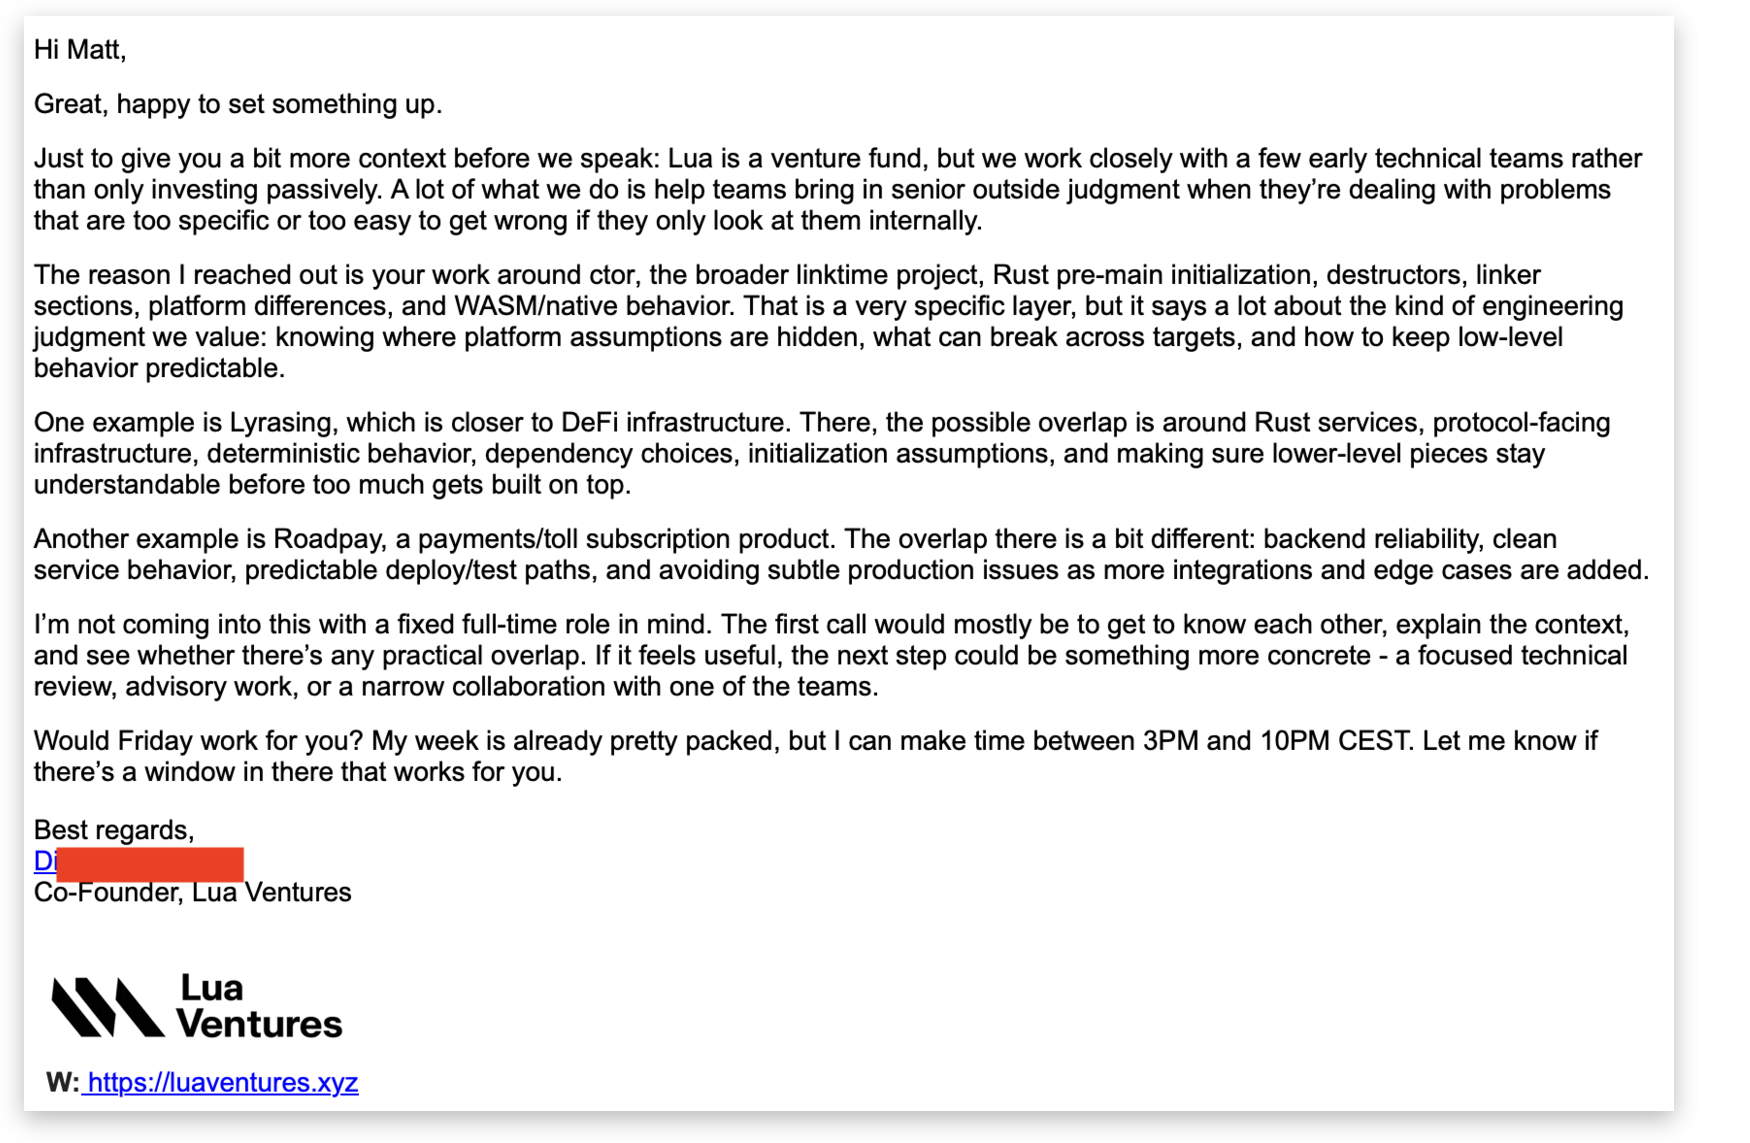
The attacker even name-dropped two of their investments that were specifically looking for advisory work: Lyrasing and Roadpay. Searching for either of the companies wasn’t really a flag - they both had some very basic web presense, but nothing that would indicate they were fake rather than just early stage. (archive.org snapshot of roadpay.cc).
We went back and forth on a meeting time and eventually settled on a time we were going to chat. There was nothing odd about the call itself, either. A somewhat-difficult-to-understand man with a German accent was on the other line. He said he was taking the call while travelling which was a bit odd, but again, not necessarily a flag.
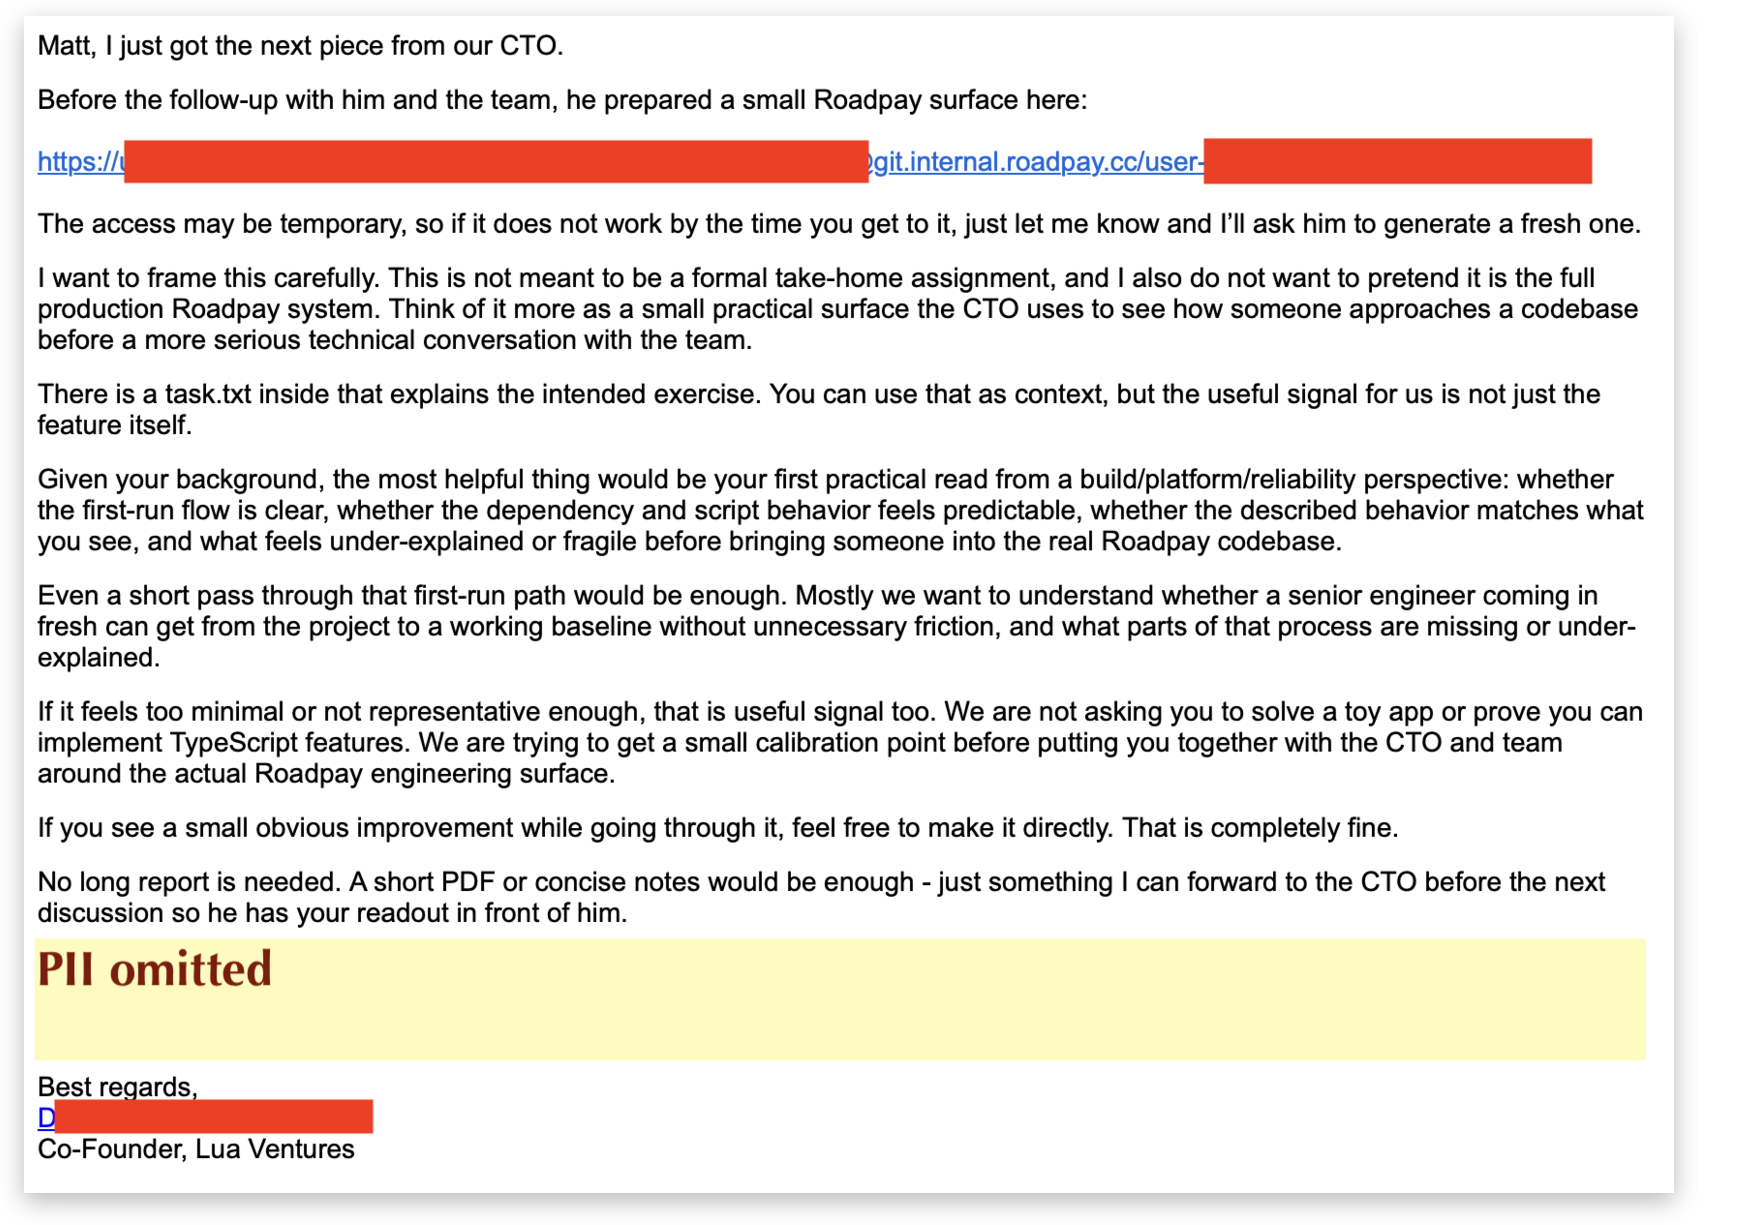
After the call came the bait. A follow-up email that offered up a “test”.
At this point I was mildly annoyed, but not suspicious. I cloned the repo, but the first true red flag only fired here.
Where I got lucky: they sent me a TypeScript repo. It didn’t make sense to me. The instructions looked more like a TypeScript job interview than any sort of architecture analysis. I decided to zip up the repo and toss it into the Claude to get a quick scan - a combination of caution and laziness.
A few moments later it had identified some oddities:
Notably, the root package.json has no postinstall/preinstall hook — interesting, because they use patch-package, which is normally wired to a postinstall. Let me check every package.json for lifecycle scripts, then audit the patch files (the real risk surface — patches can inject arbitrary code into node_modules).
That piqued my interest. I scanned the directories myself and noticed a fairly unreasonable number of patches/ directories. The first few I checked seemed innocent enough, but as you might have guessed, they were just trying to add noise so the real payload wouldn’t get caught.
While I was checking slowly by hand, Claude identified first signs of PinpinRAT:
I found it. This is a malicious payload. Embedded in the typescript+5.9.2.patch file — inside what is presented as a routine “module specifier” patch to TypeScript — there is a base64-blob self-executing obfuscation stub injected at the very top of both _tsc.js and typescript.js:
This decodes a base64 string, XOR-decrypts every byte with the key 73, and runs the result through new Function(…) with require, process, Buffer, etc. handed in. That is a hidden code-execution payload that fires every time tsc or anything importing typescript.js runs — i.e. on the very first npm run typecheck / build / dev.
… and that’s the point where I decided to stop poking the bear on my own machine. I zipped it up with a password to stop myself from accidentally detonating it and kept running the analysis in the sandbox.
The Trap
The repo is themed as a ferry-ticketing app named “Ticket Harbor”. The task.txt included in the bundle was a plausible set of boring tasks, but ended with:
Run the repo typecheck, test suite, and relevant desktop/server build commands before submitting.
That instruction is the trap that gets you.
The chain works like this:
Four separate postinstall hooks run patch-package. But one of them also runs git update-index --skip-worktree on the patch files, which hides them from git status.
The typescript+5.9.2.patch injects a self-executing stub at the top of typescript.js and _tsc.js. This is a lightly-obfuscated blob fed into new Function(...) (avoiding eval, presumably to avoid malware detection).
That loader reads a hidden chunk appended to a file named operators/3.png, runs a small embedded WASM stub (in a custom wAsm chunk), then spawns a detached, silent Node process carrying a 1.68 MB obfuscated second-stage payload.
It cleans up after itself at three layers: the git skip-worktree trick, the dropper rewrites the patch to delete its own injected lines after first run, and the stage-2 temp directory self-deletes on execution.
The actual payload is a RAT (a remote-access trojan). I was originally worried this was a credential stealer but that’s a lot worse. PinpinRAT is nested in three obfuscated layers which were a pain to unwrap: obfuscator.io (which claims LLM protection, hah), and two further base64 layers.
What it drops
In the interest of 1) quickly sharing this info and 2) not accidentally detonating malware on my own machines, I let Claude tear apart the actual trojan in its sandbox and had it describe it to me.
To be absolutely clear: Claude was able to reverse engineer multiple levels of obfuscation over about 5 minutes of work, which is far faster than I could have.
The drop is a full remote-access trojan that seems to have been put together by someone who knows what they are doing. It sets up an RSA key locally and uses AES-256-CBC as a session key.
On startup it calls a checkin routine that harvests and exfiltrates a host fingerprint:
primary IP address (enumerates all non-internal interfaces), plus all IPs
username (os.userInfo().username)
hostname
OS type + release + platform + architecture
process PID and full process.argv
Node version
It generates an RSA-2048 keypair and a random AES-256 session key (aes_psk), then all subsequent traffic is AES-256-CBC encrypted with an HMAC-SHA256 integrity tag.
It supports the following commands:
env — JSON.stringify(process.env) dumped and sent back.
upload — reads an arbitrary file path and exfiltrates it.
download — writes attacker-supplied bytes to any writable path.
spawn — runs an arbitrary process with optional shell expansion.
ls / cd / pwd / cp / mv — general filesystem primitives.
dns — makes the host resolve arbitrary names through a specified resolver (for DNS tunneling?).
dismantle — self-removal.
Indicators of Compromise
If you ended up running one of these, you should immediately disconnect your system from the network and rotate your credentials from another machine. Remediation should be straightforward, but consider your credentials (including cookies and password-protected secrets) compromised.
These are some indicators of compromise found in the PinpinRAT malware:
C2: 89.124.107.161:80
Scheduled task (Windows): PinpinWrappedJs
Process masquerade (macOS): com.apple.WebKit.Networking
Env vars: NODT_PAYLOAD_PATH, NODT_PAYLOAD_ARGS
PNG chunk guard: WASMPACK (wAsm)
PINPIN_NO_AUTOSTART=1: stops persistence
cronjob with mutex.js (only if the RAT had permission, may not exist on macOS)
Anchor strings in typescript.js: 12ff4b51, ticket-harbor-tsc-shim-anchor
There’s a few places I should have seen flags earlier on. The goal of the campaign is to keep the flags subtle enough they don’t trigger your defences, but you need to be vigilent enough to see when enough yellow flags stack up to a red one.
The messages have some LLM tells to them when you look closer. That’s probably a sign that you should approach anything with extreme skepticism.
The LinkedIn profile looks real at first glance, but it’s filled with gibberish (“BSc(Hons), MA (Dist), PGDipFM, CEng”?) that should at least trigger sort of salad vibes. No real activity.
The social media link on their website has a real history, but the name was changed in November 2025. The posts are all pretty vacuous, vague praise for companies that aren’t really described in any detail.
None of the companies that had websites had a real presence beyond their flashy websites.
They never sent a proper invite - it was just a time and a Google Meet. What VC doesn’t use a calendar? Their camera was off the whole time and they were “travelling”.
And the overall approach, a VC fund based in Singapore, operating out of CEST, reaching out to a developer in Canada, with domains targeting American customers but ending in .cc. It’s far more difficult to check credentials of an organization that’s so far away.
Nothing was obvious without hindsight, but the missing pieces are there if you look at the whole thing together.
So who was this?
It’s impossible to say for sure, but this was targeted, had a pretty convincing cover story with a fake persona, multiple fake websites with stolen history, and a patient timeline. The git trap was sophisticated. This “fake-interview scam” has been a theme for a number of actors in 2026.
Who is actually behind this is the responsibility of the agencies now. What is worth noting is that this was targeted to developers like you and I, and that I was lucky enough to see a red flag right before springing the trap.
And to be honest, what’s terrifying and sobering to me is that if this had been a Rust repository with a booby-trapped build.rs script, I might have even fallen for it.
]]><![CDATA[There Is Life Before Main in Rust]]>2026-06-11T00:00:00+00:00https://grack.com/blog/2026/06/11/life-before-main
Disclosures
🧠 This post is 100% human-written. Claude was used for feedback and to assist with the linker symbol diagram. Cursor was used for feedback and to ensure examples were compilable.
The author of this post is deeply interested in the topic of life-before-main: he is the author of the ctor crate, and the creator of the linktime project that we’ll be using in the examples below.
Every Rust binary has one thing in common: fn main(). If you come from the C world, that might be more familiar as int main(argc, argv). Some platforms might obfuscate it a bit more, but under the hood, every binary has an entrypoint.
We’re going to discuss what happens beforemain and what interesting things we can do there. In addition, we’ll be showing some novel techniques for mutable data that aren’t in common use in the Rust ecosystem today.
This post is a deep dive into some technical details of how Rust source becomes a Rust binary. Some background knowledge may be helpful to the reader, including:
What might not be familiar to most developers is how you get into the main function. You see, under the hood for every language is the runtime. C has one: the C runtime that you might recognize as libc. Rust also has its own runtime: the Rust standard library. And because C is the lingua franca of runtimes for most executable code 1, Rust builds its own runtime atop of C’s, effectively building its own higher-level abstraction encapsulating C’s.
A runtime is a bit fuzzy to define. It’s both the executable code that lives on disk and compilable headers and libraries used at compile time. But the purpose of a runtime is always the same: integrating developer code with the platform’s operating system.
There’s an entire ecosystem of processing that happens before the function you declared as main starts up. C uses this to configure allocation, file access, thread-local storage and other C runtime services. Rust uses this time to configure parts of its own language and runtime. Specifically, Rust has infrastructure to handle panics and unwinding. Rust also needs to translate the C-style program arguments 2 into its own std::env::args interface. The machinery for all this is visible in the Rust compiler project.
Runtimes make use of this pre-main phase because it guarantees (1) running before user code, and (2) a single-threaded, highly-consistent and predictably-ordered environment, which allow for reliable and deterministic initialization.
By not taking advantage of this environment, you are missing out on a very useful bootstrapping phase. We’ll see later on in this post how we can build some useful primitives making use of life before main.
Entry Points
A binary starts when the operating system’s loader 3 - the part of the OS that loads the binary into memory and sets up the environment - hands off control. The runtime is responsible for accepting the hand-off from the loader. There’s a platform-specific hook on every OS that accepts the hand-off - to some extent this is the real main. On Linux, the entry point is stored in the e_entry field of the ELF header, and by default, the linker places the address of a symbol named _start there. A similar hook exists on Windows, and boots the executable in a function named _WinMainCRTStartup. At this point the C runtime has a chance to configure itself, and the way that all runtimes do this is via initialization functions.
In early iterations of runtimes, bootstrapping was a static tree of function calls: initialize file I/O, initialize the allocator, etc. As runtimes became more complex, this tree of function calls became more complex, and binary sizes increased to absorb more C runtime functionality that they may or may not need.
Over time, linkers developed the ability to discard unused code before even writing the binary to disk (including unused parts of the C runtime), and with that came a need for a replacement for the static init call trees.
The most popular method 4 of declaring init code came from GCC: __attribute__((constructor)). The way this worked was to place a list of init functions into a contiguous chunk of the binary on disk. When the C runtime started, it could walk through each of these functions and call them, allowing various bits of the C runtime to request initialization without strongly coupling subsystems, and allowing the linker to jettison unused subsystems, init code and all.
Eventually the need for constructor ordering became important enough that constructors could be given a priority and run in a specific order, allowing the runtime to initialize subsystems before and after each other. E.g., the memory allocation (malloc) subsystem might be needed for buffered file I/O.
On most platforms 5, the linker was called in to do the priority work: each platform ended up with a way to prioritize the order in which data gets written to sections, which allowed for the C runtime to end up with a well-ordered list of function pointers 6.
We can even build an example of this by hand in Rust using the #[unsafe(link_section = "...")] attribute (try it in the Rust Playground):
/// Linux example: the modern glibc runtime uses `.init_array` to hold function/// pointers, and a numeric suffix allows them to be ordered. Note that priorities/// less than or equal to 100 are reserved for the runtime itself, so any code that/// wants to use the C runtime must use a priority of 101 or higher.// On Linux, `.init_array` holds _function pointers_, not functions.// We can convert a function to a function pointer with one of the below// blocks which is equivalent to this://// #[used] // <-- without this, Rust might decide the init function is unused and remove it// #[unsafe(link_section = ".init_array.NNNNN")] // <-- the section where we place the function pointer// static INIT_ARRAY_FN_PTR: extern "C" fn() // = function; // <-- the function pointer data: we assign the function to it//// extern "C" fn function() { ... } // <-- the function itself#[used]#[unsafe(link_section=".init_array.101")]staticINIT_FN_FIRST:extern"C"fn()=const{extern"C"fninit(){println!("Initializing (first!)");}init};#[used]#[unsafe(link_section=".init_array.201")]staticINIT_FN_SECOND:extern"C"fn()=const{extern"C"fninit(){println!("Initializing (second!)");}init};fnmain(){println!("Main!")}
linktime: ctor, link-section and more
The examples in this post will work on Linux and various BSDs, but are not designed to be cross-platform examples. For example, macOS has start and stop symbols, but they are named differently 7. Windows does not support start and stop symbols, but has a set of rules for sorting sections that is effectively equivalent.
Because platforms are so widely variable, we’ll be introducing the ctor and link-section crates (from the linktime project) as a way to abstract away platform-specific differences and hide the general complexity of linker work.
The excellent inventory and linkme are two other very popular crates built on the same principles, but have limitations 8 that make them less suitable for the examples in this post.
The ctor crate is designed to handle all of the boilerplate of registering constructors in a cross-platform way. This allows us to simplify our examples above to:
Note that neither example explicitly calls the init functions. The linker organized them in a way that the C runtime called them for us!
Sections and Linker Scripts
The process in which constructors are linked isn’t mysterious, though. In fact, compilers allow you to name the location in the binary (on most platforms called a “section”) you want to place any of your data and/or code. And by extension, and as we saw above, Rust allows this as well. The challenge, as we will see, is making use of this organizational feature.
Linkers have been the key to C’s ability to target any form of binary for some time. Most linkers allow for developers to provide linker scripts - text files that live alongside your source code (which is compiled to object files) and instruct the linker on how those object files are assembled. Using a linker script, a single C file might become a Linux executable, or a block of raw assembly that lives in the boot sector of a hard drive.
Linker scripts also allow for defining virtual symbols - that is, symbols that don’t exist in any source file but can be used by C code to access pointers to the underlying data in the loaded binary.
Linker scripts are a complex topic and beyond the scope of this post, but we can easily find examples of them in the wild:
In the above example, the virtual symbols _TEXT_START_ and _TEXT_END_ are explicitly defined to point to the beginning and end of the .text section, respectively. The period in _TEXT_START_ = .; is a special syntax that refers to a location counter that resolves roughly to the current output address in the binary.
Linker Symbols
This trips up most developers that encounter it for the first time, but the linker is setting the address of the start and end symbols, and therefore where the static with the same name is placed, and not setting the value of symbols that are pointers. That is to say: the start and stop symbols aren’t a *const Type. The start and stop symbols carry no data themselves and are used for their addresses only! The section consists of the range of data between the start (inclusive) and stop (exclusive) symbols.
Section
Static
Value
Linker symbol(s)
my_numbers
_DATA_1
11
⎫ ⎬ ⎭
_DATA_1, _start_my_numbers
_DATA_2
22
_DATA_2
_DATA_3
33
_DATA_3
_DATA_4
44
_DATA_4
(past the end)
↤
_stop_my_numbers
Specifying start and end symbols for every section can be complex and tedious in linker scripts, so many linkers 9 eventually gained a feature where they could automatically define symbols bounding all sections in the executable. E.g., for GNU toolchains, a section named MY_SECTION will automatically have symbols __start_MY_SECTION and __stop_MY_SECTION defined. macOS has a similar pattern where it synthesizes a section$start and section$end symbol for each section.
In the GNU linker, those sections not explicitly defined in the linker script are called “orphan sections” 10. One important thing to note: if (and only if!) a section’s name is compatible with a C symbol name, the linker will automatically define a _start- and _stop-prefixed symbol for the section. In the example you’ll see below, the section name our_strings that we used works, but if we had chosen our.strings or .our_strings it would not have!
You’ll see in the example below that the start and stop symbols are MaybeUninit<()>. The boundary symbols contain no data, and only their address is significant.
The ideal Rust type for these would be an “opaque external type” (this would be implemented by the extern_types feature). As these are not currently implemented in Stable Rust, MaybeUninit is a stand-in. It signifies to the compiler that the data is uninitialized, and generally not safe to read via reference. Since taking a &raw const pointer to a static item is always valid, however, we can still safely capture its address without ever reading its value.
usestd::mem::MaybeUninit;#[used]#[unsafe(link_section="our_strings")]staticFIRST_STRING:&'staticstr="Hello, ";#[used]#[unsafe(link_section="our_strings")]staticSECOND_STRING:&'staticstr="world!";// Note: these are not pointers. Instead, the linker has placed// the boundary symbols STATIC_STRING_START and STATIC_STRING_END at// the start and end of the section!unsafeextern"C"{#[link_name="__start_our_strings"]staticSTATIC_STRING_START:MaybeUninit<()>;#[link_name="__stop_our_strings"]staticSTATIC_STRING_END:MaybeUninit<()>;}fnmain(){letstrings:&'static[&'staticstr]=unsafe{// SAFETY: get the addresses of the start and end symbols without// reading them.letstart=&rawconstSTATIC_STRING_STARTas*const&'staticstr;letend=&rawconstSTATIC_STRING_ENDas*const&'staticstr;std::slice::from_raw_parts(start,end.offset_from(start)asusize)};// "Hello, world!"println!("String: {}",strings.join(""));}
The link-section crate is designed to abstract away the details of these linker sections and convert them into traditional Rust slices with all standard slice operations available. We can use it to simplify the example above to:
In these examples we’re submitting items to the link section in a single module within a single crate, but that’s not a requirement. In fact, the power of link sections is that you can submit items to a link section from any crate that contributes code to a binary - the linker will gather them all together just before writing the final binary.
Dependency Injection
The registration pattern we’re about to build is Dependency Injection by another name. This is a well-known pattern: frameworks like Dagger and Spring are built on the same principle that consumers of registration data should not be coupled to the providers of that data. A provider registers data at its definition site, a consumer simply reads the registry.
What’s somewhat different with linker sections versus traditional DI is that in DI the framework often needs to walk the module graph or scan loaded classes at startup to discover both providers and consumer sites. With linker sections, this magic is handled when the binary is written. The linker is the one that gathers all of the provider data and makes it trivially available to the consumer.
The example below uses a link_section::section to register CLI subcommands and is an instance of this pattern. More complex projects like Turbopack use this pattern to register string-pool constants, and the registration machinery used for serialization/deserialization and turbotask incremental compilation functions. A hypothetical webserver could make use of this pattern to register routes and middleware that are automatically collected at build time. The core mechanism is the same: the contributors place data into a shared registration system from any crate in the dependency tree, and the consumer reads the collected data without having to know where it was provided from.
Using Sections for Registration
One advantage we have in doing work before main is that it is well-behaved. No threads are running unless we start them. This means we are able to avoid the complexity of locks and other synchronization primitives in many cases, and that we can explicitly split our writable and immutable phase of our data’s lifecycle clearly: before and after main. And because of that, accessing data in the running program can become both simpler and more efficient by avoiding the need to acquire and release locks.
First, we’ll define our subcommand, a const constructor function, and a #[section] to collect them:
Then we’ll register subcommands - these can live anywhere in your code:
modlist{#[in_section(CLI_SUBCOMMANDS)]staticCLI_SUBCOMMAND_LIST:CliSubcommand=CliSubcommand::new("list","List all items",|_exe,_args|{println!("Listing all items");});}modadd{#[in_section(CLI_SUBCOMMANDS)]staticCLI_SUBCOMMAND_ADD:CliSubcommand=CliSubcommand::new("add","Add a new item",|_exe,_args|{println!("Adding a new item");});}modhelp{#[in_section(CLI_SUBCOMMANDS)]staticCLI_SUBCOMMAND_HELP:CliSubcommand=CliSubcommand::new_default("help","Show help",|exe,_args|{println!("Usage: {} <subcommand> [options]",exe.display());println!();println!("Subcommands:");forsubcommandinCLI_SUBCOMMANDS{println!(" {}: {}",subcommand.name,subcommand.description);}});}
And then in our main function we can dynamically dispatch to any registered subcommand without ever having to know what they are or where they live. It only needs to be able to see the CLI_SUBCOMMANDS section definition:
fnmain(){letmutargs:VecDeque<String>=std::env::args().collect();letexe=args.pop_front().expect("No executable name provided");letexe=Path::new(&exe);letsubcommand_name=args.pop_front().unwrap_or_default();letrest:Vec<String>=args.into();// Try to find the subcommand by nameforcmdinCLI_SUBCOMMANDS{ifcmd.name==subcommand_name{(cmd.f)(exe,&rest);return;}}// If no subcommand was found, fall back to the default subcommandforcmdinCLI_SUBCOMMANDS{ifcmd.is_default{(cmd.f)(exe,&rest);return;}}}
Running the code above works as you’d expect:
$ ./cli
Usage: ./cli <subcommand> [options]
Subcommands:
list: List all items
add: Add a new item
help: Show help$ ./cli list
Listing all items
Beyond Immutable Data
This section deals with some more advanced topics. Familiarity with Rust Atomics and Locks, or at least reading the first chapter on the basics of Rust concurrency, is recommended!
The example above assumes that the linked data is immutable. But that’s only half the power of using linker organization for data. Mutability in global static data is a common problem with well-known solutions in standard Rust. We could potentially use Rust’s built-in tools for interior mutability like mutexes, or atomic types, for example. Each of those comes with some runtime cost. If they are “uncontended” they aren’t expensive, but they are not necessarily free. 11
But what if we want to minimize the overhead of runtime data access? Immutable data is trivial: Rust allows safe concurrent access to immutable data by default 12. Rust has strict requirements for mutable data, however. There are two requirements to safely mutate data: (1) the modifications must be done in a thread-safe manner, and (2), there must never be more than one reference to the data if a mutable reference exists.
At the beginning of this post, we mentioned that life-before-main is a useful place to bootstrap because no threads are running unless we start them. And the solution to (1) is trivial if the data is currently accessible to a single thread only! We don’t need to do anything atomically; we only need to ensure that all of the changes we make to that data “happen before” any reads to the data. In a single-threaded environment, “happens before” is automatic 13. This means that we can mutate data in a link-section before main and it will be safe to access, lock free, from any thread after main.
The resolution for (2) is similar: as long as we only ever take a mutable reference (and only a mutable reference!) before main, there will never be more than one reference to the data when a mutable reference exists.
The pre-main environment satisfies both (1) and (2), without needing to reach for locks or other synchronization primitives.
There’s also one additional gotcha with linker sections we need to be very careful with: the slice that contains all of the items in a section is an alias to the static item that lives in the section. The rules about aliasing apply to both the slice and the static item, and you must ensure that static items are placed in UnsafeCell to safely mutate them from the slice 14. Rust does not allow a static item to be modified through other means. With static items that aren’t wrapped in an UnsafeCell, LLVM may consider itself free to cache, reorder or otherwise make assumptions about the data itself. UnsafeCell itself is not Sync, so you’ll need to add your own wrapper types on top of this!
Note that in the example below, we’re now using MaybeUninit<SyncUnsafeCell<...>> for the boundary symbols and SyncUnsafeCell<...> for the items.
Because we’re planning on sorting the slice, we need to tell Rust that the slice items are not immutable so the data doesn’t end up in read-only memory. By using a type that includes UnsafeCell - a semantic signal that Rust uses to indicate interior mutability - the Rust compiler will then know to place that data in a part of the binary that can be written.
On some platforms (Windows in particular), omitting this from the data items will cause segmentation faults when trying to sort the slice. On other platforms (AIX for example), section mutability is part of a section’s identifier, so the boundary symbols’ mutability needs to match the section’s mutability!
Let’s walk through an example of how we might otherwise do something like this. We’re going to build a string interning pool defined entirely at link-time, and add a wrinkle: we want to be able to sort the slice of interned strings at runtime so we can quickly intern a string by value if needed via binary search (try it in the Rust Playground):
usestd::cell::UnsafeCell;usestd::mem::MaybeUninit;#[cfg(debug_assertions)]usestd::sync::atomic::{AtomicBool,Ordering};/// Nightly Rust offers a built-in `SyncUnsafeCell`. This is a minimal/// reimplementation of that: /// <https://doc.rust-lang.org/std/cell/struct.SyncUnsafeCell.html>#[repr(transparent)]structSyncUnsafeCell<T:?Sized>(UnsafeCell<T>);// SAFETY: safety burden of UnsafeCell is placed entirely on the userunsafeimpl<T:?Sized+Sync>SyncforSyncUnsafeCell<T>{}macro_rules!intern_string{($name:ident,$string:literal)=>{#[allow(unused)]const$name:&'staticstr=const{// This is not a common pattern, but it's entirely valid// to nest static items inside of const blocks. // You can think of this as a way to hide the symbols// in a completely anonymous namespace.constVALUE:&str=$string;// Safety note: this static must _never_ be used. This is// purely a submission to the linker and _any_ access to it// may be UB.#[used]#[unsafe(link_section="our_strings")]staticITEM:SyncUnsafeCell<&'staticstr>=SyncUnsafeCell(UnsafeCell::new(VALUE));VALUE};};}intern_string!(WORLD,"world");intern_string!(EXCLAMATION,"!");intern_string!(HELLO,"hello");intern_string!(FROM,"from");intern_string!(RUST,"Rust");unsafeextern"C"{#[link_name="__start_our_strings"]staticSTATIC_STRING_START:MaybeUninit<SyncUnsafeCell<()>>;#[link_name="__stop_our_strings"]staticSTATIC_STRING_END:MaybeUninit<SyncUnsafeCell<()>>;}/// Debug check to make sure the slice is sorted once and only once. This _could_/// be enabled in release mode without any major performance impact, but we have enough/// guarantees in place. Note that atomic access _does_ establish some memory ordering/// guarantees, but the soundness guarantees are upheld with or without this atomic check.#[cfg(debug_assertions)]staticSLICE_IS_SORTED:AtomicBool=AtomicBool::new(false);// Implementation note: this function must not be called before `SORT_STRINGS_CTOR` has// run.fninterned_strings()->&'static[&'staticstr]{// We use Acquire/Release pairing as a double-initialization check#[cfg(debug_assertions)]debug_assert!(SLICE_IS_SORTED.load(Ordering::Acquire),"Oh no! Slice was not sorted!");// SAFETY: we are calling this after main and we can guarantee that no// mutable reference is still alive. Since we know that no other code// is running before main, and that `SORT_STRINGS_CTOR` will run before main,// we can guarantee creating these slices is safe as 1) the sort "happens-before"// any access and 2) the mutable reference has been closed before any read-reference// access (satisfying aliasing XOR mutability requirement).letstrings:&'static[&'staticstr]=unsafe{letstart=&rawconstSTATIC_STRING_STARTas*const&'staticstr;letend=&rawconstSTATIC_STRING_ENDas*const&'staticstr;std::slice::from_raw_parts(start,end.offset_from(start)asusize)};strings}// Implementation note: this function assumes the slice has been sorted. See// the guarantee above on `interned_strings` for reasoning.fnmaybe_intern_string(s:implAsRef<str>)->Option<&'staticstr>{lets=s.as_ref();letstrings=interned_strings();strings.binary_search(&s).ok().map(|index|strings[index])}// SAFETY: We use the reserved `.init_array.0` priority because we do not// access any C runtime functions (sort_unstable does not allocate) and we// want to run before all other code. `.init_array.101` would work in our// case, but this prevents other early-init code from accidentally running// in the wrong order. `SLICE_IS_SORTED` is a debug check to make sure that// doesn't happen. Note that all early-init code is tagged with `unsafe` so// it always needs to be aware of safety guarantees of all APIs it touches.#[used]#[unsafe(link_section=".init_array.0")]staticSORT_STRINGS_CTOR:extern"C"fn()=const{extern"C"fnsort_strings(){// We use Acquire/Release pairing as a double-initialization check#[cfg(debug_assertions)]debug_assert!(!SLICE_IS_SORTED.load(Ordering::Acquire),"Oh no! Sorted twice?!?");// SAFETY: we are calling this before main and we can guarantee that no// reference from `interned_strings` exists yet because we know no other// threads will be running, and we're not calling `interned_strings` yet.letstrings:&mut[&'staticstr]=unsafe{// SAFETY: the bounds markers are not mutable, but we can safely// cast them to mutable pointers because we know the data behind// them is stored within `UnsafeCell` which is Rust's way of // giving us interior mutability.letstart=&rawconstSTATIC_STRING_STARTas*mut&'staticstr;letend=&rawconstSTATIC_STRING_ENDas*mut&'staticstr;std::slice::from_raw_parts_mut(start,end.offset_from(start)asusize)};strings.sort_unstable();#[cfg(debug_assertions)]SLICE_IS_SORTED.store(true,Ordering::Release);}sort_strings};fnmain(){for(i,s)ininterned_strings().iter().enumerate(){println!("[{i}]: {s}");}println!("{}, {}{}",HELLO,WORLD,EXCLAMATION);println!("{}, {}{}",maybe_intern_string("hello").unwrap(),maybe_intern_string("world").unwrap(),maybe_intern_string("!").unwrap());}
The above example is pretty heavy (and a bit thicker thanks to the generous commentary), but it’s a good example of how much boilerplate crates like ctor and link-section can save you.
The equivalent using those crates can make use of the TypedMutableSection and a ctor to ensure the items are sorted before main. Note that the requirements for TypedMutableSection are that the items must be const - the reason is that the mutable section uses a similar style of code to the manually-implemented example above.
//! String interning pool using `ctor` and `link-section`.usector::ctor;uselink_section::{in_section,section};#[section(mutable)]staticINTERNED_STRINGS:link_section::TypedMutableSection<&'staticstr>;#[in_section(INTERNED_STRINGS)]constWORLD:&'staticstr="world";#[in_section(INTERNED_STRINGS)]constEXCLAMATION:&'staticstr="!";#[in_section(INTERNED_STRINGS)]constHELLO:&'staticstr="hello";#[in_section(INTERNED_STRINGS)]constFROM:&'staticstr="from";#[in_section(INTERNED_STRINGS)]constRUST:&'staticstr="Rust";#[ctor(unsafe)]fnsort_strings(){letstrings:&mut[&'staticstr]=unsafe{INTERNED_STRINGS.as_mut_slice()};strings.sort_unstable();}fnmaybe_intern_string(s:implAsRef<str>)->Option<&'staticstr>{lets=s.as_ref();letstrings=INTERNED_STRINGS.as_slice();strings.binary_search(&s).ok().map(|index|strings[index])}fnmain(){for(i,s)inINTERNED_STRINGS.iter().enumerate(){println!("[{i}]: {s}");}println!("{}, {}{}",HELLO,WORLD,EXCLAMATION);println!("{}, {}{}",maybe_intern_string("hello").unwrap(),maybe_intern_string("world").unwrap(),maybe_intern_string("!").unwrap());}
This particular example isn’t impossible without link sections, of course. What we get from the patterns we’ve discussed in this post are three things: (1) the guaranteed aggregation of tagged items, with all data pre-allocated and contiguous in memory; (2) the ability to distribute registrations anywhere in the code; and (3) a guaranteed count of the items in the section.
One major benefit that falls out of the three advantages above is that link sections require no allocations. If we were to rewrite this without link sections we’d be allocating a HashMap, Vec or other data structure, and potentially resizing it a number of times as we gather items (because we don’t actually know how many items we’ll have until runtime!).
The second major benefit that falls out is the Inversion of Control. The dependency graph for a traditional “collection” approach looks like below, with shared types deeply nested in the dependency graph, modules depending on that shared types module, and then a collector module that depends on all those modules to collect their types:
The change doesn’t seem large, but there is a large impact: the collector can now live anywhere and no longer needs to care what modules are contributing data:
And of course, we aren’t just limited to slices: you’ll find that there are analogues to many data-structures with link-time support in the scattered-collect crate:
Scattered*Slice: Various Vec-like structures that provide slices (and optionally sorting).
ScatteredMap/ScatteredSet: An analogue to HashMap/HashSet that provides hashed key-to-value lookup with some minimal pre-main initialization.
But Seriously: When Not to Use This
Link-time computation is fun and powerful, and it’s not always the right tool for the job. There is often a non-link-time equivalent: manually collecting data in crates that have visibility into each crate that wishes to contribute data. This can be inconvenient at times - instead of the contributors seeing a single contribution point “upstream” in a core crate, a “collector” crate with lots of crate references is required to collect them all.
Dead-code elimination becomes challenging: the link-section crate (and the linkme equivalent) both decorate all items using #[used], so the linker is disallowed from pruning unused data. Figuring out how to make link-time collection and dead-code elimination work well together is a complex problem beyond the scope of this post. For smaller bits of data like interned string atoms this might not be a problem, but if a program wants to intern larger chunks of data like chunks of raw JSON/JavaScript, or extensive data structures, this may add up to a lot of dead-code that may be difficult to identify.
Pre-main constructor functions have limitations: they cannot panic 15, Rust does not guarantee that all stdlib functions are available, and the order that the initialization functions are called within a given priority level is not guaranteed and highly platform-dependent. With careful planning, these limitations may be worked around but life-before-main may not be correct for subtle and difficult-to-debug reasons.
At this time, Miri is not fully compatible with all pre-main constructors and link-section constructions: it has a very basic view of pre-main execution, and does not model link sections at all. This may improve over time, but as of the time of writing, LLVM sanitizers (ASan, TSan, and others) are the recommended way to test for undefined behaviour.
The Inversion of Control pattern also has a cost: it makes it potentially harder to audit all the places that contribute data to a link section.
In reality, many widely-deployed and heavily-used Rust programs already rely on pre-main functionality: the ctor, link-section, inventory and linkme crates are used by many downstream crates today.
Briefly, on WASM
The examples above omitted a fairly important platform, though for good reason. WASM does not currently support linker sections natively because of an inconvenient choice many years back (51088 and 52353 for more details). Instead of allowing the #[link_section] annotation to place items in a true code section, the items are placed in a WASM custom section which is inaccessible to the WASM code itself!
The linktime crates do support WASM and have an emulation workaround that makes the approaches work for WASM binaries, but the author of this post hopes to make a suggestion in the near future on how proper WASM support could be added!
Conclusions
You can do a lot before main, and the benefits of doing so are pretty significant for certain cases. It’s a highly-ordered, highly-controllable environment that lets you more confidently do a lot of work without locks, atomics and other synchronization primitives. Link sections give you arbitrary aggregation and co-location of related data across your whole binary without awkward crate dependency order. In a lot of cases you can even avoid allocations completely which helps keep you away from one of the worst allocator sins: churn of allocations leading to fragmentation.
For further reading, check out the various crates discussed in this post:
ctor: Module initialization functions that run before main
dtor: Not discussed in this post, but the shutdown analogue to ctor
link-section: Linker-managed typed (slices) and untyped sections, with mutability support.
Thanks to my lovely wife Mia, Benjamin Woodruff and Luke Sandberg, as well as @ssokolow for their feedback and review. This post would not have been possible without their help.
Go is a notable exception in that it avoids the C runtime on some platforms, only using libc as an ABI stability boundary on platforms that require it e.g., Apple’s libSystem.dylib and OpenBSD’s libc. ↩
On Windows, these are DOS-style (which were in turn derived from CP/M-style) arguments. ↩
Before the loader runs, the program is just some bytes on a disk and the loader (which can be the kernel itself or a user-space system component like ld.so on Linux) maps those bytes into memory and hands off control. ↩
The most popular method… in the humble author’s opinion. ↩
macOS does not support this. The C runtime does its own initialization and then just runs every user constructor function in the order the linker saw them. ↩
AIX has a special symbol naming convention for constructor functions: the sinit prefix, followed by a hexadecimal priority value. ↩
This will be discussed later in the post, but macOS synthesizes a section$start and section$end symbol for each section instead of a __start_ and __stop_ symbol. ↩
linkme creates distributed slices, but does not currently support WASM, and does not support mutable section data required to sort a section. inventory supports WASM, but requires a ctor-like function per item in the section. ↩
For example, an atomic value must always be re-read, and that may incur use of CPU cache which is pretty numerous these days, but definitely not infinite. ↩
As long as it’s Sync. Sync means that it’s safe to share a reference to the data between threads. ↩
This is a complex topic, and Rust Atomics and Locks is the best resource for learning more. Starting a new thread means that all the previous writes “happen before” anything on the new thread, but we’ll leave the proof of this for the reader (or possibly a future post). ↩
Well, more accurately they can panic but they shouldn’t panic. In fact you’ll get a double panic: thread '<unnamed>' panicked at ...: pre-main panic! and then immediately thread '<unnamed>' panicked at ...: panic in a function that cannot unwind. ↩
]]><![CDATA[Deriving a Bit-Twiddling Hack: Signed Integer Overflow]]>2022-12-20T00:00:00+00:00https://grack.com/blog/2022/12/20/deriving-a-bit-twiddling-hackAs a thin layer on top of assembly language, C’s integer arithmetic APIs have always been minimal, effectively just mapping the underlying assembly opcodes to the C arithmetic operators. In addition, while unsigned arithmetic can safely overflow in C, signed arithmetic overflow is considered undefined behaviour, and UB can end up in heartache for C developers.
More modern languages like Rust have a much richer integer API, however. By default, using the standard addition and subtraction operators in debug mode, integer APIs will panic! on overflow or underflow. The same operators will wrap in two’s-complement mode in release mode, though the behaviour is considered defined. If the developer wants to specify carrying, wrapping, checked, or saturating operations, APIs for each of these modes are available.
We don’t have these convenient APIs available in C yet (see the epilogue for some nuance), but it would be great to have them. Given that signed arithmetic overflow is undefined behaviour, can we build a function with the following C signature that works?
boolwill_add_overflow(int32_ta,int32_tb);
All modern machines use two’s complement representation for negative integers, but C was developed when computing was experimenting with other forms of representing signed integers. In this post, we will safely assume that all processors we’re targetting on are not using one of the alternative forms. If you find yourself programming for esoteric machines, you may wish to consult your local manual or guru.
A valid, quick-and-dirty solution to this would be to use integer promotion and add 64-bit signed integers instead, checking to see if the result is within range of an int16_t:
boolwill_add_overflow_64bit(int32_ta,int32_tb){// a and b are promoted to 64-bit signed integersint64_tresult=(int64_t)a+b;if(result<INT32_MIN||result>INT32_MAX){returntrue;}returnfalse;}
No undefined behaviour! It also has the advantage of being easily read and obviously correct. But this required sign-extending two 32-bit numbers and performing two 64-bit additions:
We can do better by taking advantage of the fact that on two’s-complement machines, addition is bitwise-identical between signed and unsigned numbers so long as you ignore carry, overflow, underflow and any other flags. In addition, the C specification (C99 6.3.1.3 ¶2) guarantees that the bit pattern will be preserved on a two’s-complement system.
We know that unsigned overflow is not UB, and we know that we can only overflow if a > 0 and b > 0, and we can only underflow if a < 0 and b < 0. If either a or b is zero, we’re safe. We also know that adding two positive integers must result in a positive result if no overflow occurred. For two negative integers, the result must also be negative. If we find that the sign of the sum does not match the sign expected, we’ve wrapped around!
boolwill_add_overflow_if(int32_ta,int32_tb){// Explicitly convert to uint32_t and then backint32_tc=(int32_t)((uint32_t)a+(uint32_t)b);if(a>0&&b>0&&c<0){returntrue;}if(a<0&&b<0&&c>=0){returntrue;}returnfalse;}
And we get a fairly hefty assembly representation:
This is arguably a bit worse, as now we have a branch in the mix. But we can start to see a pattern here:
a
b
c
result
> 0
> 0
< 0
true
< 0
< 0
>= 0
true
In two’s-complement, the expression x < 0 is equivalent to the expression (x & 0x80000000) == 0x80000000. Similarly, x >= 0 is equivalent to (x & 0x80000000) == 0.
Let’s create a NEG macro with the above expression and reproduce our pseudo-truth table in code. Note that we’ll also collapse the if statements into a single boolean expression so we can eliminate those branches:
boolwill_add_overflow_expression(int32_ta_,int32_tb_){// Explicitly work with uint32_t in this functionuint32_ta=(uint32_t)a_,b=(uint32_t)b_;uint32_tc=(uint32_t)a+(uint32_t)b;#define NEG(x) (((uint32_t)(x) & 0x80000000) == 0x80000000)
return((!NEG(a)&&!NEG(b)&&NEG(c))||(NEG(a)&&NEG(b)&&!NEG(c)));#undef NEG
}
This is looking better, but because we’re using short-circuiting logic, those branches are still there: we still have a jump!
Notice that the assembly gives us a bit of a hint here that repeated use of our macro isn’t actually necessary. The sign bit we’re interested in isn’t tested until the end of the function! Because we’re testing the same bit in every part of the expression, and bits in a given position only interact with other bits in the same position, we can pull that bit test out of the whole expression:
Not too bad! But let’s revisit the truth table and instead use the value of the sign bit directly. What we see is that a and b need to be the same value, and c needs to be the opposite value:
a
b
c
1
1
0
0
0
1
This truth table shows that what we ultimately want to test is this:
(a == 1 && b == 1 && c == 0) || (a == 0 && b == 0 && c == 1)
… but with a bit of work, we can simplify this down to two shorter expression candidates:
(a == b) && (a == !c)
(c == !a) && (c == !b)
For bit twiddling like we’re doing here, xor (^) can work like a “not-equals” operator (outputs 1 iff the inputs are 0,1 or 1,0), which means we can re-write our two expressions like so:
~(a ^ b) & (c ^ a)
(c ^ a) & (c ^ b)
By looking at those two options, is there a hint that one might be cheaper to implement? Let’s plug both into the compiler and see what we get!
We have a clear winner here: the compiler can do a much better job with (c ^ a) & (c ^ b). This is most likely because of the common sub-expression and the removal of the bitwise-not operator.
It turns out that both GCC and LLVM have C intrinsics that you can use. While they are non-portable to some compilers, they drastically simplify the assembly output!
]]><![CDATA[Bootstrapping a language]]>2022-12-16T00:00:00+00:00https://grack.com/blog/2022/12/16/painting-myself-in-a-bootstrapping-cornerI was hoping to make more progress on self-hosting my scripting language (Kalos) this week, but I’m running out of steam because I think I coded myself into a corner. This is not a post where I’ve got everything figured out, but instead I’m taking a few moments to re-hash where things are at and figure out a plan for the future.
My original plan for this language was to offer a Python-like experience with minimal resource requirements: it should be able to run on an AVR, on bare metal, or even as part of a DOS executable. I had originally planned to support compilation on those devices, and even built a zero-allocation parser. The runtime is lightweight, integers are a configurable size, and strings are even optional. I believe it’ll be a great option on lower-end devices where Python is just too heavy.
Over the last week I started work to extract a small piece of the parser that deals with KIDL (example of KIDLE below), the part of the language that glues it to your C code. This is currently part of the existing parser, and the only piece that I could think of to carve off on the slow march to true self-hosting.
I also ended up hacking in some dynamic-dispatch objects that help with not having classes, but that’s not a long-term thing that I want to support in lieu of a proper object/class system.
Eventually I’ll have to commit to rewriting the whole parser in Kalos, but as the title of the post suggests, I’m stuck in a potential energy well where the next steps are going to be difficult. The current parser is written in C and – while the code is pretty clean – it’s a lot of work to make changes to it. It’s going to take some time and effort to add support for things like classes, tear-off functions, etc, and being allocation-free doesn’t make any of this easy.
My mistake was being too ambitious and going right for C as the bootstrap, rather than something higher level. I should have started with Python as the bootstrap!
So I need to gather enough energy to choose and work on one of the following paths:
Commit to rewriting the parser in Kalos, maybe after adding support for hashtables/dicts to the language. The language spec is still small enough that I could port the current parser. Debugging is very difficult, and you need to ensure that you’re running the code while developing it to discover if you’ve accidentally stepped on one of the many landmines. Once I have the parser/compiler in a higher-level language like Kalos itself, these landmines will be much easier to fix!
Rewrite the parser in Python, knowing that I’ll have to rewrite it in Kalos later. This might not be terrible because the language is supposed to be python-like and there might be a mechanical translation route available. The thought of writing more code to throw away doesn’t fill me with a lot of joy, but it might just be what I have to do.
Scrap the hand-rolled parser and switch to something like Lemon. We’re already using the amazing re2c to write the lexer, so adding another tool isn’t a bad idea. Again, we’re putting in a bunch of effort knowing that this will be tossed away later, but maybe there’s a middle ground like just having Lemon build an AST, then have Kalos script generate the bytecode?
]]><![CDATA[Hacking Bluetooth to Brew Coffee from GitHub Actions: Part 3 - GitHub Actions]]>2022-12-04T00:00:00+00:00https://grack.com/blog/2022/12/04/hacking-bluetooth-to-brew-coffee-on-github-actions-part-3This is the last part of a three-part series covering the odyssey of getting a new coffeemaker, learning BTLE and how it works, reverse-engineering the Bluetooth interface and Android applications for the coffeemaker, writing a Rust-based CLI interface, and finally, hooking it all up to a GitHub actions bot that lets you brew a coffee just by filing an issue!
In part 2 we got the command-line application working, and now it’s time to connect the dots and build a secure, yet web-accessible interface.
We could choose a standard web host, add some sort of authentication on top of it, build the right web tooling to integrate with the nice command-line application we built, and all the associated security so random people can’t brew coffee. But as you’ve guessed from the title of these posts, we’re going hook this command-line app into a private GitHub repo as our “interface”.
Making use of GitHub issues for automating weird things isn’t new, but I think this is the first time you can make coffee from it!
Getting Started
Here’s our goal:
We want to allow users to brew a coffee from a GitHub issue, which will be pre-populated from a number of pre-defined templates
The issue will contain part of the command-line that we want to run, and we’ll need to validate that it’s reasonable and correct, and that nobody is trying to inject any sort of “funny business” to break/backdoor the runner
We don’t want coffee brewers to have to chase down the status of the brewing operation, so we’re going to make use of issue comments as our basic UI. The user will be able to follow the progress of their coffee inside of the issue, and get a notification when it’s done.
This is what the user will see just before they brew the coffee:
The first question you might have is how we’re going to talk to a Bluetooth coffeemaker from GitHub’s system. This part turns out to be pretty easy: we can use GitHub self-hosted runners as a backdoor into the coffeemaker’s physical location! By running this on a computing device that has a Bluetooth radio in proximity to the coffeemaker, we can send commands to it in response to events occurring in a repo. Conveniently the Raspberry Pi 3 Model B and Pi 4 both support Bluetooth, but in our case we’re going to be using a spare MacBook that’s kicking around.
First thing, we need to create a new runner on GitHub for our project, and then set up the runner on the MacBook:
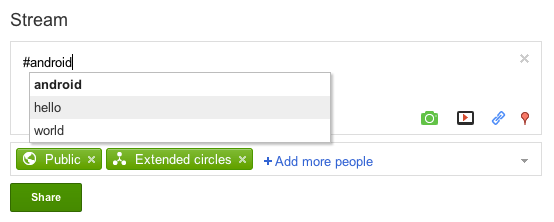
GitHub actions are pretty flexible and we have a huge number of events that can trigger them. In our case, we want the creation of a new issue to trigger a run, so our trigger becomes:
on:issues:types:[opened]
We’ll pull in the create-or-update-comment action from peter-evans for updating the user about the status of their coffee:
And once the coffee is brewed or the process has failed for some other reason, we’ll want to close that issue, so we’re going to pull in peter-evans/close-issue for this:
The actual brewing part will be pretty easy as well, but it’s going to require use to fetch the text of the issue and use that to create the command-line to run.
Let’s take a look at the event information that GitHub provides to us in $GITHUB_EVENT_PATH. There’s a lot that GitHub provides for us in this file, and this particular one is trimmed down significantly:
{"action":"opened","issue":{..."body":"This is my issue body comment\r\n",..."title":"This is my issue title!",...}...
jq is one the best tools for integrating JSON APIs with shell scripts, so we’ll make use of that. We’ll create a small test JSON file called test.json that contains just the interesting subset of what’s available in the file at $GITHUB_EVENT_PATH:
{"action":"opened","issue":{"body":"This is my issue body comment\r\n","title":"This is my issue title!"}}
First, we can test extraction of the issue body:
$ jq -r'.issue.body' < test.json
This is my issue body comment
$
That worked, but we’ve got some extra whitespace there. We can trim that with another jq command, gsub. By replacing leading or trailing whitespace (gsub("^\\s+|\\s+$";"")) with nothing, we can get just the text of the comment:
$ jq -r'.issue.body|gsub("^\\s+|\\s+$";"")' < test.json
This is my issue body comment
$
Better!
Extracting the Command-Line
Now what we want to do is allow the user to specify the command-line in the issue, but ensure that they can’t run anything nefarious on the runner. We developed a command-line cappuccino recipe in part 2 that we ran like this:
Since we are creating a valid partial command-line for our brewing app, we can make use of that fact that we know the exact structure. In this case, we know we want it to:
Start with the subcommand brew
Next, contain the beverage to brew with --beverage <something>
Finally, contain a list of beverage parameters which are limited to coffee, milk, hotwater, taste, and temperature. Each parameter is separated from its value by a space (ie: --coffee 100), and is either a number or an enumeration value (ie: --taste strong).
We can then build a regular expression that will be limited to just the arguments we’re allowing here. We’ll use the \w character class as it’s a close match to the values required by our parameters.
We could go further in validating the --beverage parameter, or the values for the ingredients, but we know that those are carefully checked in the application and we’ll let the application handle the validation:
Next, we’ll process the requested brew operation using the jq incantation from earlier. This step will create a body.md that we’ll use to update the comment, as well as cmdline.txt that will be used to execute our brewing operation later on:
-name:Process the requestrun:|OUTFILE=body.mdCMDLINE=$(jq -r '.issue.body |gsub("^\\s+|\\s+$";"") |select(test("^brew --beverage \\w+( --(coffee|milk|taste|hotwater|temperature) \\w+)*$"))' < $GITHUB_EVENT_PATH)echo Command-line we parsed was: $CMDLINEif [[ "$CMDLINE" == "" ]]; thenecho " - [X] Couldn't parse the command line from your comment? 🤔" > $OUTFILEexit 1fiecho -n ' - [X]' Running brew command: \`$CMDLINE\` > $OUTFILEecho ' [(Log here)](https://github.com/'${GITHUB_REPOSITORY}'/actions/runs/'${GITHUB_RUN_ID}')' >> $OUTFILEecho "/tmp/longshot/bin/longshot $CMDLINE --device-name $" > cmdline.txt
-name:Brew coffeerun:|echo '<details><summary>Log</summary><pre>' > log.mdsh -c "`cat cmdline.txt`" | tee -a log.mdecho '</pre></details>' >> log.mdecho '✅ Success!' >> log.md-name:Update comment on successuses:peter-evans/create-or-update-comment@v2with:issue-number:$comment-id:$body-file:log.md
Finally, we’ll log a message to the comment on an error, and close the issue unconditionally:
-name:Update comment on failureif:failure()uses:peter-evans/create-or-update-comment@v2with:issue-number:$comment-id:$body:|<br>❌ Failed! Please check the log for the reason.-name:Close issueif:always()uses:peter-evans/close-issue@v2
And with all those steps, we can get ourselves a coffee from GitHub!
While you can’t access my private repository that I’m using to brew us coffee at home, you can definitely try out the example repo that I’ve set up here which uses the command-line interface’s simulator and runs on GitHub’s action runners instead:
]]><![CDATA[Hacking Bluetooth to Brew Coffee from GitHub Actions: Part 2 - Reverse Engineering]]>2022-12-02T00:00:00+00:00https://grack.com/blog/2022/12/02/hacking-bluetooth-to-brew-coffee-on-github-actions-part-2This is part 2 of a three-part series covering the odyssey of getting a new coffeemaker, learning BTLE and how it works, reverse-engineering the Bluetooth interface and Android applications for the coffeemaker, writing a Rust-based CLI interface, and finally, hooking it all up to a GitHub actions bot that lets you brew a coffee just by filing an issue!
In part 1 we got our coffeemaker brewing using a sniffed command that we logged from the actual application, and then sent to the coffeemaker using a small Rust program. However, we don’t really understand the language we’re speaking yet, we’re just repeating the application-to-device babbling we’ve snooped.
Understanding the Packets
Now that we know that we can send a request, we want to understand what the format of the request looks like. The first thing we want to do is understand what a packet is. A packet is a chunk of data of a defined length, in contrast to a stream of data that continues indefinitely. Packets are used throughout most communication technologies and are a fundamental way of describing discrete communication messages.
When dealing with embedded devices, packets will almost always have a header, and sometimes a footer. The header and footer are called the framing of the packet, and they delimit it so we can identify exactly where it starts and stop.
Inside the header and footer might be things like start-of-packet, or end-of-packet markers, and a length for framing. There may also be additional metadata like a checksum to detect corruption.
Why is this framing important? Devices will often use framing to help recover from corruption. If you lose or corrupt a byte anywhere in the packet, you can often recover synchronization quickly by just restarting the packet parsing at the next byte that looks like a start byte.
Here’s a few packets we captured being sent from the coffeemaker to the application while asking it to brew a coffee, and then waiting for it to finish cleaning:
0d0575f0c4d5                             # Some sort of status request
0d1483f007010100410900be02030c001c0206dc # Brew a cappuccino
0d0883f00702062f41                       # Cancel brewing

d00783f0010064d9                         # Response to brew/stop request
d012750f02040100400700000000000000d621   # Status response
d012750f04050100400c030900000000001cf0   # Status response
d012750f000000000000036400000000009080   # Status response
What information can we glean from this? First of all, the first byte is always 0d or d0 (13 or 240 in decimal), suggesting this is a start-of-packet byte that varies depending on the direction of communication. That’s one byte probably identified!
Next, the second byte of the packet seems to vary depending on the length of the packet, and it corresponds exactly with the change in packet size. This is highly likely to be a length, and from what we can see here in a couple of the packets we captured earlier, it would be the length of the packet not including the start-of-packet byte.
We can’t glean much about the rest of the packet yet, but we’re getting some of the framing nailed down here. Time to pull out some more analysis tools.
There are three approaches we can use to understand the binary language of Delonghi’s ECAM machines:
We can disassemble the firmware of the coffeemaker and understand what it expects and what it sends, or
We can observe the application’s communication with the coffeemaker over a period of time, changing one or two things at a time and seeing what changes in the protocol, or
We can disassemble the application that controls the coffeemaker and understand its inputs and outputs.
The firmware of the machine itself would be the ideal place for us to look, but according to some various coffeemaker-hacking forums, the controllers are PIC-based, and disassembling/dumping PIC firmware somewhat tricky.
In addition, a disadvantage to disassembling microcontroller firmware is that due to size constraints, it’s far less likely for text strings to have survived the compilation process to give us hints as to what’s going on. Finding leftover snippets of logging or “debug” print statements are gold for the reverse engineer, and we’d like to use that as a signpost to guide our future work.
Observing the application’s communication directly is definitely an option. This is inconvenient as we saw from the HCI snooping adventures earlier on, and we might not know how to perturb the system enough to fully understand most of the fields we receive.
The best option we’re left with is disassembling the application itself and looking for hints as to what it’s doing, hopefully for some symbols that give us names, or text strings that may give us context.
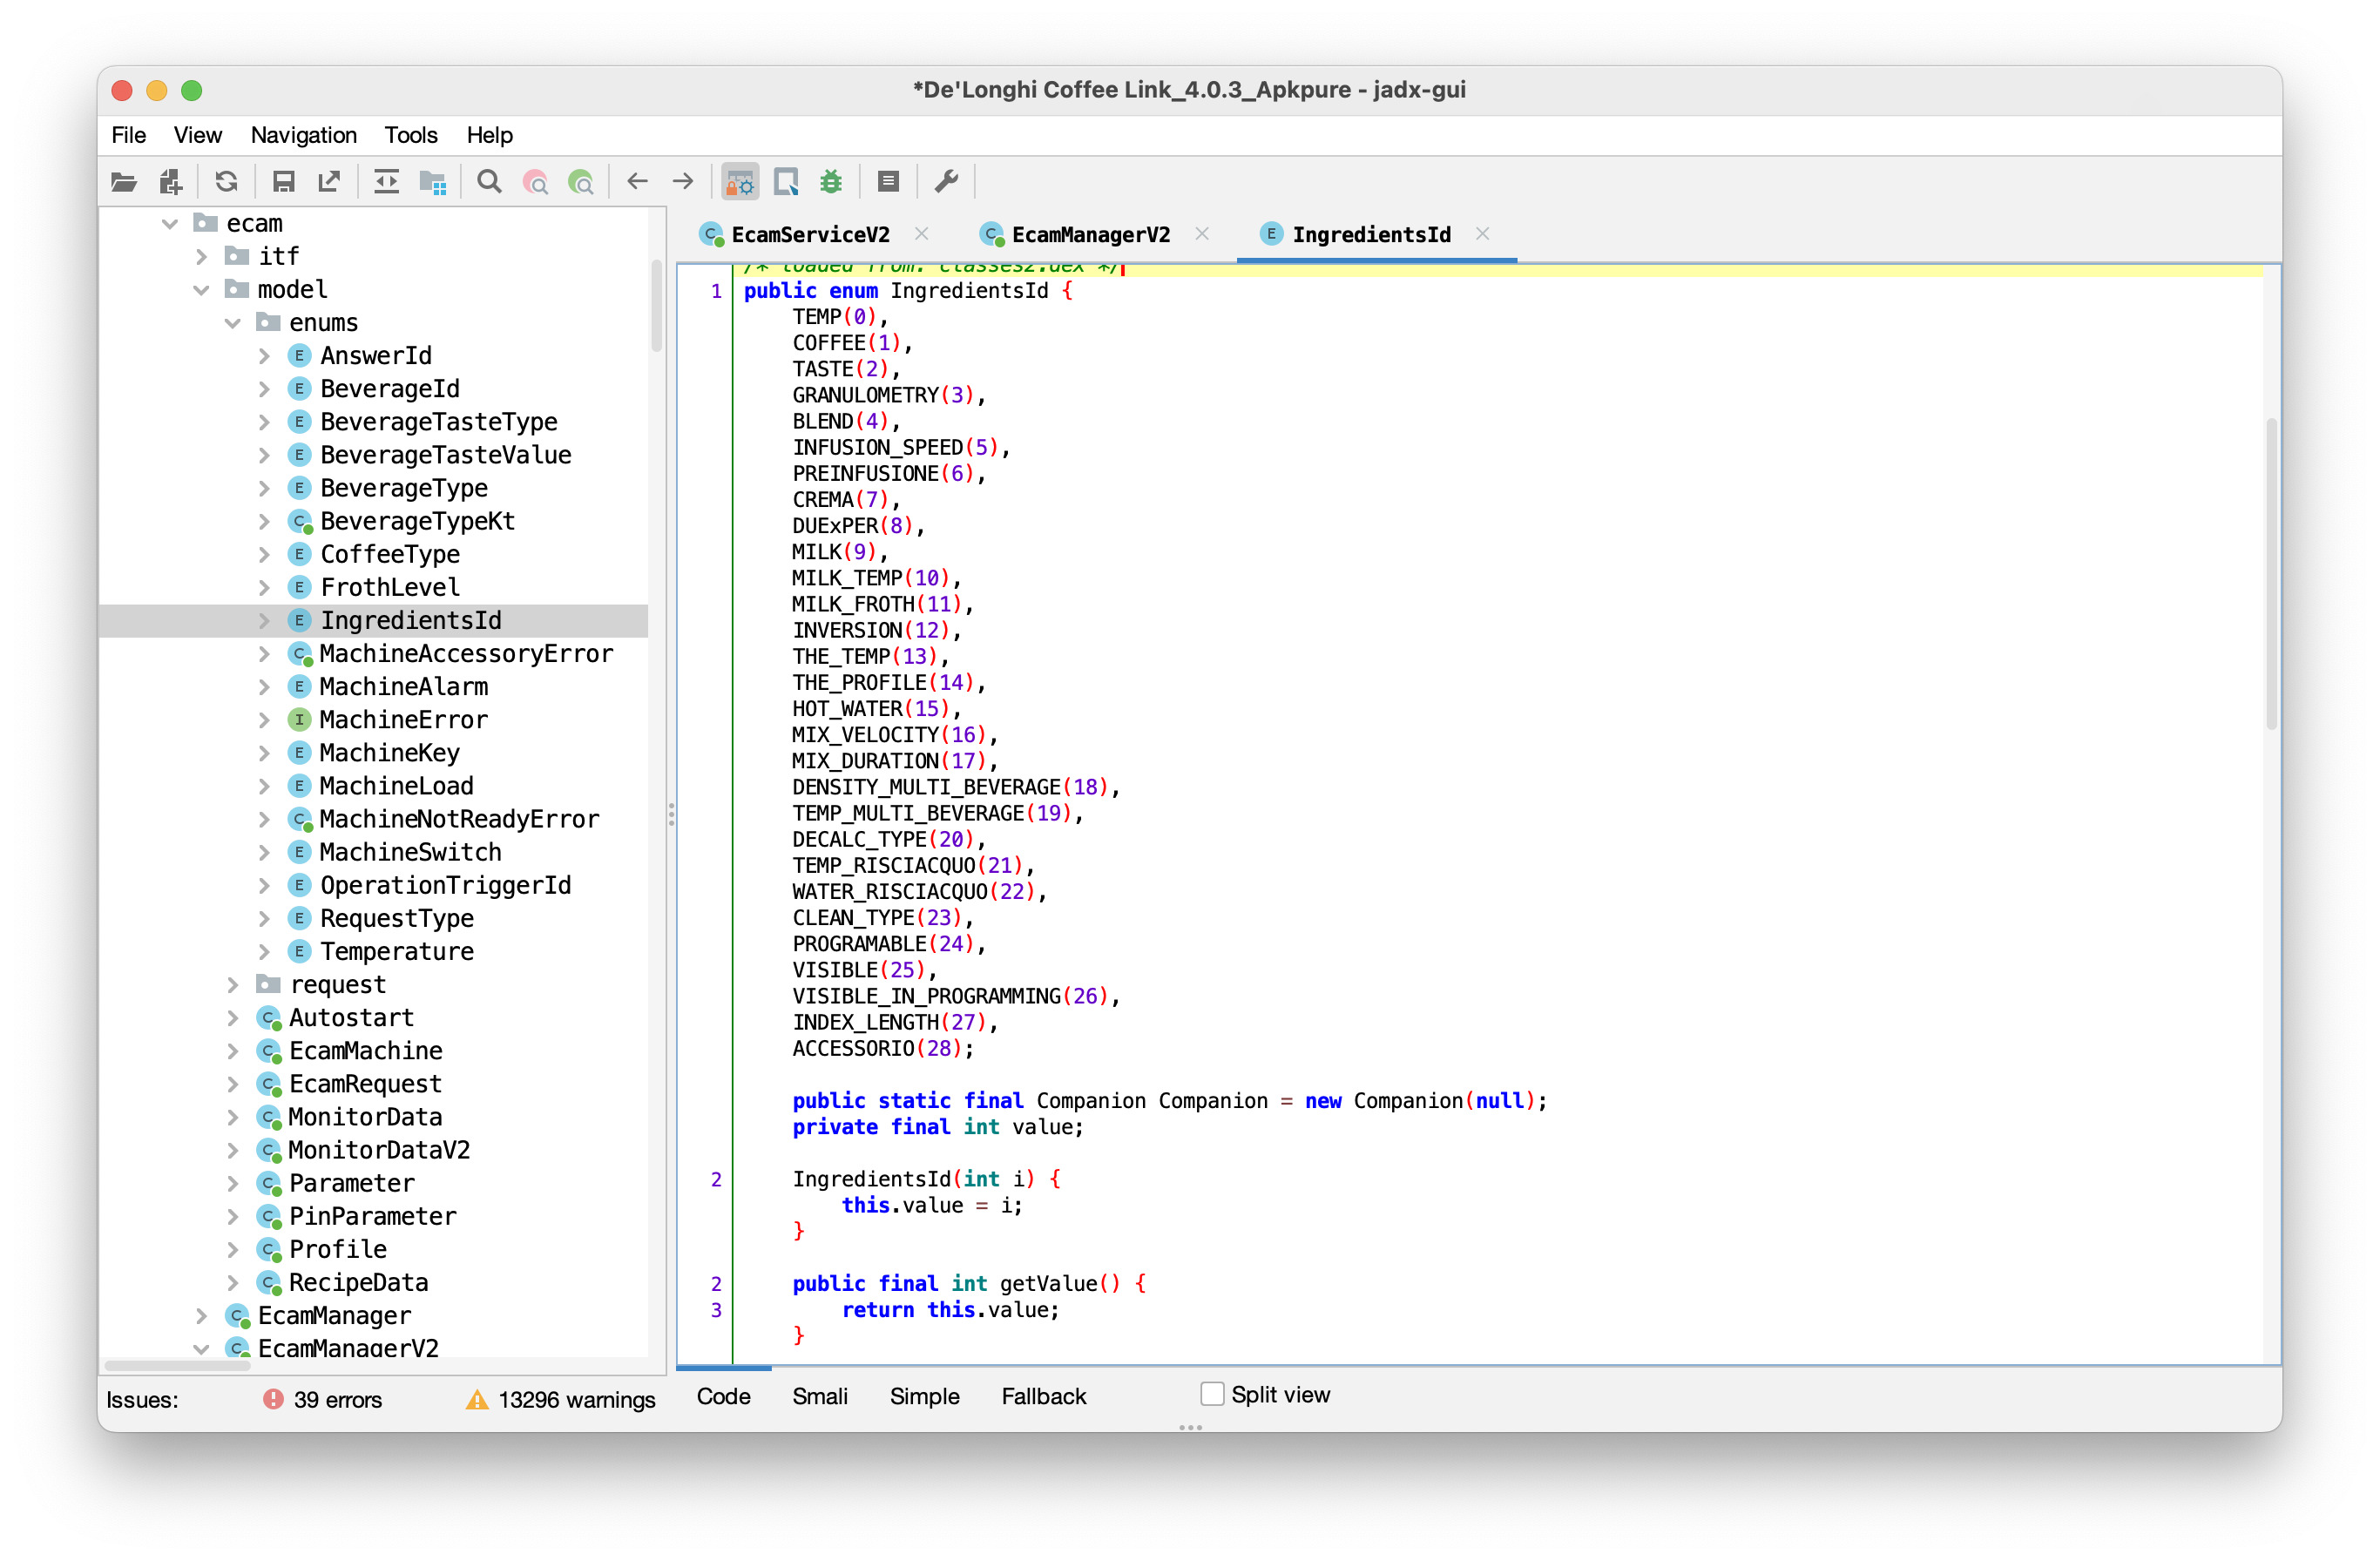
Disassembling the Delonghi APK
We’re going to disassemble the Delonghi APK to learn more about how we can automate our caffeine fix.
Android applications are shipped in APK (Android Package Kit) format, and we’re going to download a few historical versions of the APK from APK Pure, a site that archives older versions of shipped applications. Getting a few different versions is a good idea, as developers will sometimes forget to enable obfuscation in some versions. If we’re lucky enough to get a version of the application without obfuscation, we can get the internal names for constants and fields.
In the past, APK decompilation was somewhat tricky. As Android is Java-based, but doesn’t use Java’s bytecode directly, either you’d need to learn how to understand smali, or you’d use dex2jar to convert the app to a faux-Java JAR file and use standard Java analysis tools to reverse engineer it. Jadx is a new Java analysis tool, which is far easier to use and much more powerful than the older tools.
Let’s open the APK in Jadx. Once it has decompiled that app, the first thing we’ll notice is that there are package names here. This is great news and suggests that even if the application is obfuscated, it’s not obfuscated fully and we’ll be able to learn how it ticks.
When we dig into some of the classes, we see method and field names, showing us a pretty clear representation of the original source code. Even better news!
After decompiling, our first goal should be to conclusively identify the framing of the packets and answer the questions we raised earlier on. With some reading through the source, we can identify the source of one of the packets we saw being sent to the machine…
We can see the canonical source for every byte in that packet above in this function. 0d is the start_of_packet header. 05 is the length, and it looks like it’s just hardcoded here since the packet is always the same length. We can also see that the last few digits are a checksum, and if we dig into the checksum function, how it is calculated:
Great! checksum looks like it could be one of the CRC family of functions, but we don’t necessarily have to fully understand it yet if we have its implementation. We now have all the framing necessary to construct any packet:
d0 LE (data) C1 C2
^  ^         ^--^-- Our checksum bytes
+  +--------------- Length of packet, minus start-of-packet
+------------------ Start of packet (0xd0 or 0x0d depending on direction)
Now we can start to guess at the meaning of the rest of the bytes. Byte 2 appears to be a command ID. Byte 3 is a constant, and scanning the rest of the file suggests that it’s always 0x0f or 0xf0, depending on the command. That leaves the remainder of the packet for the command payload, if it’s used for the command.
0d 05 75 f0 c4 d5
^  ^  ^  ^  ^--^-- Our checksum
|  |  |  +-------- Always 0xf0 or 0x0f
|  |  +----------- The command ID (0x75 = monitor mode 2)
|  +-------------- The packet length
+----------------- Start of packet (0x0d)
Since we have a single spot for calculating the packet checksum, and we know that every request requires a checksum to be calculated, we can figure out all the places in the app that create request packets to get a better idea of what we can ask the machine to do by looking for the callers of checksum:
This is very interesting! There’s a lot of commands here, and each of them has a reasonably-well-defined name that we can use to understand what its function might be. We’ll have to start working through them one-by-one. With a bit of work, we can assemble a table of these commands:
Some of these request IDs are guesses based on the surrounding code context, and some of them are defined in enumerations in the application source. It’s a pretty good start for us to get going on figuring out how to brew our own beverage from scratch.
Revisiting the brew command
From just the bytes sent across the connection it’s difficult to understand exactly how the application is creating the packet to brew a coffee. However, in the disassembly we find a function dispenseBeveragePacket that appears to construct the packet we saw before:
So, from this pseudocode we see that a beverage is constructed from a list of ingredients (which with some further investigation, we find in the disassembled source as IngredientsId below), and an associated one or two byte value (param.getDefValue() above). Digging through the source for which ingredients are one or two bytes doesn’t yield much fruit, but maybe we can understand what’s going on by investigating further.
Where do we go next? We find that there are two commands that, based on their name, seem to be related to the application UI used for brewing: RecipeQuantityRead and RecipeMinMaxSync.
Let’s try sending these commands to the machine! To do this, it’s time to re-visit our Rust code.
First, let’s create a function that will add the packet framing (header, length and checksum) to any payload we want to send:
pubfnchecksum(buffer:&[u8])->[u8;2]{letmuti:u16=7439;forxinbuffer{leti3=((i<<8)|(i>>8))^(*xasu16);leti4=i3^((i3&255)>>4);leti5=i4^(i4<<12);i=i5^((i5&255)<<5);}[(i>>8)asu8,(i&0xff)asu8]}fnpacketize(buffer:&[u8])->Vec<u8>{letmutout=[&[0x0d,(buffer.len()+3).try_into().expect("Packet too large"),],buffer].concat();out.extend_from_slice(&checksum(&out));out}asyncfnrun_with_peripheral(peripheral:Peripheral,characteristic:Characteristic)->Result<(),Box<dynstd::error::Error>>{letdata=packetize(/* data */);peripheral.write(&characteristic,data,WriteType::WithoutResponse);Ok(())}
Now we can start sending some example packets and exploring the responses. Here’s two test packet’s we’ll send (in pseudo-code and byte form):
The first part of the response packets appear to be the machine echoing back the input. This makes sense, as the application will need a way to match up responses to requests.
For the remainder of the packet, we have the advantage of the decompilation above. We know the list of ingredients from the IngredientsId enumeration in the decompiled source, and if we match up the type of beverages with the ingredients, it makes a lot of sense that it’s what we’re seeing here:
From reading the application source, these packets seem to represent the current settings for the beverage, and the minimum and maximum ranges for each of the parameters. We can also start to guess at what the lengths of each of the ingredients’ parameter values are: most are a single byte, but a handful seem to be reliably two bytes wide and they all seem to deal with liquids.
Let’s confirm our intuition here by looking at the recipes for a latte and hot water:
Let’s send that to the machine and see what happens:
Success! We have the most complicated and important part of communication with a coffeemaker working: brewing the coffee.
There’s a bit of work required to turn this into a full application, but you can find that pre-written in my longshot project on GitHub. You don’t need to have this coffeemaker, as it includes a simulator mode that will allow you to brew a virtual coffee and test out the packet parsing and generation code.
Continue reading… In part three of the series we’ll hook this up to GitHub Actions so that we can automate coffee brewing from the browser!
]]><![CDATA[Hacking Bluetooth to Brew Coffee from GitHub Actions: Part 1 - Bluetooth Investigation]]>2022-12-01T00:00:00+00:00https://grack.com/blog/2022/12/01/hacking-bluetooth-to-brew-coffee-on-github-actions-part-1This is going to be a long journey in three parts that covers the odyssey of getting a new coffeemaker, learning BTLE and how it works, reverse-engineering the Bluetooth interface and Android applications for the coffeemaker, writing a Rust-based CLI interface, and finally, hooking it all up to a GitHub actions bot that lets you brew a coffee just by filing an issue!
I’ve always been pretty content with using whatever coffeemaker I had nearby. For the last two or three years I’ve been using an old 2-in-1 Breville YouBrew coffeemaker, with a grinder built-in. It was a workhorse and worked perfectly until this September. A few months ago the machine asked me to run the regular descaling process to deal with our hard water, and this is where our adventure starts.
For those of you without hard water, our water in Canada like that of Italy, tends to be hard due to the type of rocks that water passes through on the way into our water supply. Over time, the hard water minerals precipitate out and stick to the metallic pipes and heaters within the machine, causing the temperature of the brewing water to drop, and other quality problems. Regular descaling is recommended, and some modern machines feature special descaling modes and chemicals that make this easier to do.
To descale a machine, you generally use a weak acid like vinegar, or a more complex descaling agent to dissolve the precipitate as salts so they can be flushed out. Unfortunately, the last time I ran the descaling process on this coffeemaker the acid I was using seems to have degraded one of the internal seals and the machine began to leak significantly.
Faced with the prospect of opening it up and actually figuring out what part was leaking, I was finally convinced that given the amount of coffee we drink, it was time for us to invest in a more modern and little more upscale coffeemaker.
Fortunately a few months earlier over the same Spring, my partner had been TA’ing a course at a building in a nearby hospital over the summer and came home raving about a machine they had, that let her brew coffee from an application: the Delonghi Dinamica Plus. We talked about how cool it was to brew from an app and how it could make so many different drinks, but we both forgot about it for a few months until our the old machine failed.
Our coffee situation was pretty dire and we decided to pull the trigger on a Delonghi Dinamica Plus, despite the eye-watering price. We waited anxiously for a week, keeping the old coffeemaker in service by putting it inside a tray to catch the leaks.
When the new coffeemaker arrived we set it up and – to avoid a major digression – the coffee it made was excellent. Tasty espresso, perfect americano, creamy cappuccino. There was one major problem: the application you’re supposed to use for the coffeemaker doesn’t reliably connect and stay connected to the machine.
The Dinamica Plus is about $100 more than the Dinamica, and this cost is effectively for the privilege of brewing coffee from your phone (along with some other goodies, like defining your favourite or custom drinks from the couch). The application is difficult to use and a bit buggy, however. It will often fail to find the coffeemaker. Once you’ve connected, there’s no guarantee that it’ll allow you to connect again without wiping all the saved data from the application. It’s also integrated with some sort of online service that returns a 404.
I found myself at a crossroads here: Do I accept that the extra features that I paid for will go to waste, or do I dig in and see if there’s some way I can get this feature to work in a way that I can actually use it. There’s a lot you can learn by being forced to dig into something new, and it looked like this might be an opportunity to understand a bit more about Bluetooth. So, as you can probably guess from the remaining length on this topic, I took the latter path.
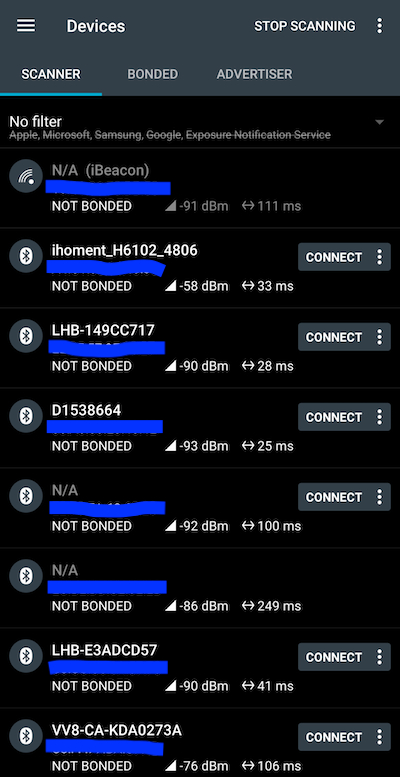
BTLE Background and Traffic Sniffing
The first question we need to answer is how we’re going to talk to this thing. We know it’s Bluetooth from the application’s insistence that Bluetooth be turned on. But it’s not showing up on my MacBook’s Bluetooth devices list, which means it’s somehow different than the common Bluetooth “Classic” audio and phone devices that show up there.
There may be other reasons why the coffeemaker doesn’t show up in a list of Bluetooth devices on a laptop, but the most likely candidate for something that isn’t Bluetooth Classic like those devices is Bluetooth Low-Energy, or more commonly known as BTLE.
One of BTLE’s major fame was its use in iBeacon for the Apple ecosystem: a way of transmitting that a physical location was “interesting” in some way to some set of applications. This is done by “advertising” Apple’s Bluetooth SIG identifier, along with an ID that specifies you’re talking iBeacon language, and some metadata allowing you to identify two 16-bit numbers of data along with that.
BTLE devices are often hidden from general device users, and you access them through specific programs and applications. For example, if you’re looking to rent a scooter, the app might communicate directly with the scooter over BTLE to unlock it for use directly from the phone – no cellular radio required!
We can scan for BTLE devices using an app like nRF Connect that will show us all the nearby devices to our mobile phone. In the screenshot below you’ll see everything that speaks BTLE that my phone can see:
There’s no obvious coffeemaker here but we can start to make some educated guesses by using signal strength. We’ll walk from the couch to the coffeemaker and see that one of our BTLE devices shows an increasing signal level.
We can confirm that this is the right device by forcing a connection to it and seeing the same Bluetooth icon appear on the screen that also appears when the application connects.
Aha! So now we’ve proved this coffeemaker is communicating over BTLE. But let’s digress and dig into what BTLE actually is, so we can figure out how to talk to it.
At a high level, BTLE works around the concept of a Service and a Characteristic, both identified by UUIDs. A Service is a container for Characteristics and, at a high level, two services on two different devices sharing the same UUID will generally implement the same “protocol”. BTLE stacks on devices will generally allow you to scan for announcements of devices advertising a Service UUID you are interested in, allowing you to take inventory of supported devices relatively easily.
The Characteristic is an endpoint on the Service and has some directionality information embedded within it. A Characteristic at a high level provides READ and/or WRITE operations to communicate with the device, but also which of the devices in the connection can be the origin of this data (ie: does the device broadcast packets? will it send them unannounced? does the device only communicate if you send it something first?). Table 2 in this tutorial lists the options if you’re interested in more detail.
We’ve learned some important information along the way. From our scan earlier, we know the two bits we need to communicate with the device, ie: the Service UUID is 00035b03-58e6-07dd-021a-08123a000300 and the Characteristic UUID is 00035b03-58e6-07dd-021a-08123a000301.
What we need now is something to send to it. I’m not brave enough to brute force packets for an expensive coffeemaker, so let’s try to capture some real communication between the application and the device.
Android has something called the Bluetooth HCI snoop log that, as you can imagine, allows you to snoop on Bluetooth communication. HCI stands for “host-controller interface”, and we’ll use the snooper to log interaction between the phone and the coffeemaker. The process of enabling and retrieving HCI logs varieswildly between device models, so your mileage may vary.
We can tap the button in the app to brew a cappuccino and, from the logs, see what the application sends to the machine. We don’t have any context as to what these packets are, but we know that sending this will brew a cappuccino with the default parameters (which according to the application is 65ml of coffee, 19 seconds of milk, and “medium” aroma):
Now we’re going to need to talk to the coffeemaker ourselves. Each platform has its own libraries for talking to Bluetooth devices (CoreBluetooth on OSX, bluez-over-DBUS for Linux, etc.) Because of the complexity of dealing with cross-platform Bluetooth, most platforms like node.js, Rust, and Python, provide libraries that abstract this away.
My first attempts to talk to the coffeemaker were using node.js. I tried noble, and bleno, but neither appeared to work for me on my Mac. I’ve been wanting to get my Rust skills back into shape, so I decided to explore the btleplug library which is being actively maintained on all modern platforms.
To connect to the device we’re interested in, first we need to start a scan to find devices that are advertising the Service and Characteristic we are interested in. The following code fragment will ask btleplug to scan for peripherals on every adapter connected to the system.
asyncfnmain()->Result<(),Box<dynstd::error::Error>>{letmanager=Manager::new().await?;letfilter=ScanFilter{services:vec![SERVICE_UUID],};eprintln!("Looking for coffeemakers...");foradapterinmanager.adapters().await?{adapter.start_scan(filter.clone()).await?;tokio::time::sleep(Duration::from_secs(10)).await;forperipheralinadapter.peripherals().await?{eprintln!("Found peripheral");peripheral.connect().await?;peripheral.discover_services().await?;forserviceinperipheral.services(){forcharacteristicinservice.characteristics{ifservice.uuid==SERVICE_UUID&&characteristic.uuid==CHARACTERISTIC_UUID{run_with_peripheral(peripheral.clone(),characteristic).await?;}}}}}Ok(())}asyncfnrun_with_peripheral(peripheral:Peripheral,characteristic:Characteristic,)->Result<(),Box<dynstd::error::Error>>{eprintln!("{:?}",characteristic);Ok(())}
If we run this code it, prints:
Looking for coffeemakers...
Found peripheral
Characteristic { uuid: 00035b03-58e6-07dd-021a-08123a000301, service_uuid: 00035b03-58e6-07dd-021a-08123a000300, properties: READ | WRITE | INDICATE }
Looks good! We found the coffeemaker. And now we can try to send a raw packet to it that we had captured earlier that we believed was sent to brew cappuccino. Let’s change run_with_peripheral to this:
We know the UUIDs of the endpoint that we’re going to communicate with
We can write a packet to the device and see that it performs an action
This might be enough to stop here. We could trace all the packets to brew all the coffee recipes we want, but that doesn’t seem like a complete solution.
]]><![CDATA[Opinionated Dress Color Simulator]]>2015-03-01T00:00:00+00:00https://grack.com/blog/2015/03/01/opinionated-dress-color-simulatorGiven the all the fuss over the blue/black or white/gold dress this week, I whipped up a quick simulation that allows you to view the dress under different lighting conditions.
Slide the control from side-to-side to fade between the three images: a “blue/black” version where we subtract out the theoretical color of the light (#524922), the original picture, and a “white/gold” version where we add color to compensate for the perceived shadow (#392c00).
]]><![CDATA[USB-C and Modular Smartphones Are the End-Game for Convergence]]>2015-01-16T00:00:00+00:00https://grack.com/blog/2015/01/16/usb-31-ara-are-the-convergence-end-gameTwo new technologies – the modular smartphone and USB 3.1 – are set to radically accelerate the convergence of everything to a single, in-pocket device. In fact, they are so revolutionary that they will change the entire way we think about mobile computing as the iPhone did earlier this millennium.
The backbone of Project Ara is UniPro – a standard for communication not unlike Intel’s Thunderbolt – with significant bandwidth, enough to push 4k video uncompressed between them. Modules are built on top of this high-speed network.
The current pipeline for a “revolutionary” add-on in the mobile space has many gatekeepers. When FLIR wanted to launch a smartphone IR camera, they needed to build an entire phone backpack around it.
Another company, Lytro, has no smartphone equivalent to their light-field camera. Instead, you need to buy an entire custom camera or point-and-shoot system which significantly adds to the cost of the system, and requires the end-user to commit to carrying a full, purpose-built device.
The same story is playing out in the construction space. Lasermeasuring tools are following in the same backpack space. Unsurprisingly, the same pattern of building significant packaging around simple components has played out for construction tools, battery cases, high-end cameras, and Tazers as well.
The obvious advantage to an Ara-like device is that manufacturers can bring a module to market without the traditional risk-averse gatekeepers in the manufacturer (Samsung, LG, etc.) and carriers (AT&T, Verizon, etc.). If the manufacturers decide that this custom module isn’t a fit for their mass-market devices, they’ll pass.
Rather than Lytro or a small Kickstarter team convincing one of the big names to include their custom module at significant risk to both parties, the team can produce the module themselves and directly market to end-users without the overhead of developing a bulky backpack add-on.
By subverting the manufacturer channels, this significantly de-risks the process of bringing new concepts to market and will open up a flood of novel ideas.
Module development provides another channel for manufacturers to rely on the smartphone to be the “brains” of their devices. Making a custom device OS and shell will no longer make sense for companies like FLIR and Fluke when building IR cameras and borescopes for a large part of their product line – at least the products that can be used outside of emergency situations. While this is possible now through Bluetooth or audio jack hacks like Ryobi’s phoneworks, making a module will make more sense.
USB’s type-C: one cable to rule them all
USB 3.1 and the type-C cable give us the ability to reliably connect a device to external components – even those requiring high bandwidth. By plugging in a single cable, you’ll have access to over 10 Gb/s of bandwidth for transmitting USB data. In addition, the type-C cable can be used in “alternate modes” like DisplayPort for pushing video outside of the USB protocol.
What USB-C will enable is the ultimate computing convergence. When you’re at home or work and need to use the “big” screen, along with keyboard and mouse, you’ll plug into a desktop dock. This is already something happening for MacBooks: you can plug a single Thunderbolt cable into a dock and get access to a wide variety of ports.
If you need a larger experience, but don’t want to be tied to a desk, the laptop dock will be your friend. Motorola’s Atrix was the first rough iteration of this idea. It required both a USB micro and HDMI connection and it was tied to a single device. With the USB type-C connector, we will have the ability to plug a single cable into an supported device while getting video out and pushing power and keyboard/trackpad in.
The Future
The era of the laptop and personal computer will eventually come to an end, but not until they allow developers and power users to do everything they can on high-end devices as easily on mobile devices. Before this can happen professionals of all sorts, the power users of the various platforms will need as much memory and processing power as they are currently using.
The type-C connector gets us part of the way there by moving graphics and input off your mobile device, but you’ll still be processing with whatever you can carry with you on your phone. While processor speeds will be improving the mobile space, it is likely that chips on larger boards will always be more powerful.
What we’ll see is the evolution of devices that can move computation from one place to another, in near-real-time. You’ll carry a modular smartphone on your person and have a more powerful version in desktop or laptop form. Plugging the device into the larger form factor will move your computation over to a more powerful CPU/GPU with significantly more RAM. You’ll bring your storage with you – the experience of computing will expand and contract depending on where you are and what you need.
We’re not far away from this right now. With applications running on JIT systems like Dalvik, the same code can be run on two different CPU types and the same techniques we use to juggle Javascript between interpreted and optimized states can transport an application between them.
Your pocket device will be the center of your digital life: a single mobile device when you’re on the go that can act as everything you need for work and play, an entertainment source and gaming console when you’re at home in front of your TV, the storage for your laptop when you need to work on the go, and the core of your desktop computing environment for the professionals who need high performance.
Thoughts? Follow me on Twitter @mmastrac and let me know.
]]><![CDATA[What's new in CSS Selectors 4]]>2015-01-11T00:00:00+00:00https://grack.com/blog/2015/01/11/css-selectors-4Please note that this article is written about an Editor’s Draft of a specification as of January 2015, which means the information may change without notice
CSS selectors are now categorized into two groups: fast and complete. Fast selectors are those selectors appropriate for use in a dynamic CSS engine. Complete selectors are appropriate for use in cases where being as fast as possible isn’t necessarily a problem, document.querySelector, for instance.
Selectors are used in many different contexts, with wildly varying performance characteristics. Some powerful selectors are unfortunately too slow to realistically include in the more performance-sensitive contexts. To accommodate this, two profiles of the Selectors spec are defined [ref].
:has
:has is the most interesting part of CSS Selectors 4, but it comes with an important caveat described below. What it allows you to do is change the subject of the selector – i.e., the element that will actually be styled – while continuing to match elements that appear later in document order.
This opens up a great deal of new ways to match content. For instance, matching sections with a header:
// Any section that has a header element
section:has(h1, h2, h3, h4, h5, h6)
Or a developer can match all paragraphs that contain nothing but any number of images:
// Match a paragraph that does not have anything that is not an image
p
  :has(img)             // has an image
  :not(:has(:not(img))) // does not have anything not an image
Even matching an element that has a specific number of children (in this case, five):
// Sidebar with five children
div.sidebar
    :has(*:nth-child(5))       // Has a fifth child
    :not(:has(*:nth-child(6))) // But not a sixth child
Caveat: at this time the :has selector is not considered fast, which means that it may not be available for use in stylesheets. As nobody has implemented this selector yet, its performance characteristics are still an open question. If browser vendors can make it fast, it may be available for general styling as well.
In previous versions of the specification this was indicated using an exclamation mark (!) next to the subject – that syntax is now gone.
:matches
:matches is a standardization of :moz-any and :webkit-any that have existed with browser prefixes for some time. This allows a stylesheet author to collapse duplicate rule paths.
This will be useful for collapsing generated Cartesian-product-esque SCSS/SASS output like this:
  body > .layout > .body > .content .post p a.image.standard:first-child:nth-last-child(4) ~ a.image.standard,
  body > .layout > .body > .content .post p a.image.standard:first-child:nth-last-child(4),
  body > .layout > .body > .content .post li a.image.standard:first-child:nth-last-child(4) ~ a.image.standard,
  body > .layout > .body > .content .post li a.image.standard:first-child:nth-last-child(4),
  body > .layout > .body > .content .page p a.image.standard:first-child:nth-last-child(4) ~ a.image.standard,
  body > .layout > .body > .content .page p a.image.standard:first-child:nth-last-child(4),
  body > .layout > .body > .content .page li a.image.standard:first-child:nth-last-child(4) ~ a.image.standard,
  body > .layout > .body > .content .page li a.image.standard:first-child:nth-last-child(4) {
       ....
  }
The Mozilla reference page above lists some caveats about performance. As this selector makes it out into a standard, we will hopefully see performance work on this to make it leaner.
:nth-child(An+B [of S])
While :nth-of-type has existed since the turn of the millennium, CSS Selectors Level 4 is adding the ability to filter based on a selector:
div :nth-child(2 of .widget)
The selector S is used for determining the index and it is independent of the selector to the left of the pseudo-class. As noted in the specification, if you know the type of the element ahead of time the :nth-of-type selector can be converted into :nth-child(... of S) like so:
img:nth-of-type(2) => :nth-child(2 of img)
The difference between this selector and the :nth-of-type selector is subtle but important. For :nth-of-type, each element –whether or not you have applied a selector to it – has an implicit index for itself amongst its siblings with the same tag name. The selector in the :nth-child(n of S) expression creates a new counter each time you use a new selector.
There’s potential for bugs with this new selector. Since the selector inside the :nth-child pseudo-class is independent of the selector to the left of it, you can accidentally omit your subject if you specify a selector to the left that isn’t a superset of the selector inside of :nth-child. For example:
tr:nth-child(2n of [disabled])
might not work as you expect if another, non-<tr> element has the disabled attribute.
In previous versions of the specification this was the :nth-match selector.
:not()
While you might have been using :not for some time, you’ll now be able to pass multiple arguments to it to save some bytes and typing:
The descendant combinator has existed in CSS from the beginning as a space ( ), but now there’s an explicit version of it:
// Equivalent to:
//    p img { ... }
p >> img { ... }
The reasoning for this is to provide a bridge between the direct descendant (>), and the shadow DOM (>>>) operator.
Column combinator (||) and :nth-column
CSS Selectors 4 adds column operations that will allow stylesheet developers to more easily style individual columns in a table. The current approach to table styling requires using :nth-child, which does not always match up with table columns when using colspan attributes.
By using the new column combinator (||) you can now style table cells that are in the same column as a given <col> element:
// The following example makes cells C, E, and G yellow.
// (example taken from the CSS Selectors 4 specification)
col.selected || td {
  background: yellow;
  color: white;
  font-weight: bold;
}

<table>
  <col span="2">
  <col class="selected">
  <tr><td>A <td>B <td>C
  <tr><td colspan="2">D <td>E
  <tr><td>F <td colspan="2">G
</table>
Alternatively, a stylesheet author may use :nth-column and :nth-last-column to style cells.
In either case, if a cell spans multiple columns it will match a selector for any of those columns.
:placeholder-shown
One small addition to the selector language is :placeholder-shown. This matches an input element if and only if the placeholder attribute text is visible.
:any-link
The :any-link is another small selector addition. It is defined as matching anything that either:link or :visited would match.
CSS Selectors 4 is still a work-in-progress, but there are already useful selectors that we’ve seen that will offer web developers new patterns and tools for styling. There are other new selectors in the specification that I haven’t discussed here for concepts like accessibility, validity checking and style scoping.
If you’d like to play around with these selectors, you’ll need to wait for browsers vendors to catch up, or use some of the earlier implementations. :matches is available as :moz-any and :webkit-any, and WebKit nightlies have early support for :nth-child selectors behind a flag.
Since this is an editor’s draft, pseudo-class names may change without notice. Keep an eye on the specification for more information.
Comments? Follow me on Twitter @mmastrac and let me know.
]]><![CDATA[(Ab)using CSS3's :nth-child selector to invent new ones]]>2015-01-09T00:00:00+00:00https://grack.com/blog/2015/01/09/abusing-css3-selectorsIf you find this interesting, read more about CSS Selectors Level 4 which will offer you even more tools for stylesheet development.
CSS3’s :nth-child and :nth-last-child selectors are powerful: not only can they replace :first-child and :last-child, but they can style more complex patterns like the first (or all but the first) three children, every fourth child, or combinations of the pattern “a*n+b”.
But did you know that you can do more interesting things with the selectors? For example, you can style the third element, but only when it’s one of five child (the virtual :nth-of-m-child selector we’ll discuss below). Or that you can style all of the children of an element with m children (another virtual selector we’ll call :family-of-m).
You might ask why we’d want to do this – the particular use case that I had in mind was a Javascript-free, automatically-sizing image gallery that I could toss in the stylesheet for my Jekyll-based site and have it “just work” regardless of the number of images I threw at it.
Here’s an example of what it looks like (click here to view it full-page). Note how the images automatically size to a regular grid without having to use Javascript:
:nth-of-m-child
Thanks to xantys on HN for pointing me at much earlier work in this area here and here.
The first virtual selector we’ll construct is something I call :nth-of-m-child. This will allow us to style the nth child when it’s one of m children, and will be our building block for further work.
So, how do we get this selector? Easy: we combine :nth-child and :nth-last-child on a single element to select when the element to be styled is in the correct position from the start and end of the list of children. For example, we can style the third element, if and only if it’s one of five children:
span:nth-child(3):nth-last-child(3) { ... }
Breaking that down: that’s the third child and the third-last child. Given ‘n’ and ‘m’, the general formula is :nth-child(n):nth-last-child(m+1-n).
Here’s an example of this in action (click here to view it full-page):
:family-of-m
Now that we have the ability to style n-of-m, we can expand that out to style all of the children where there are m of them directly underneath a parent node. The secret to this is using the CSS3 ~ non-adjacent sibling selector which will continue matching elements across siblings. For example, the selector:
img ~ span { ... }
will match a <span> if and only if one of its previous siblings was an <img> element regardless of the number of siblings between them. We’ll combine this selector with our :nth-of-m-child pattern like so:
This pattern will match any adjacent siblings to the first element of five, ie: the second through the fifth of five. We can make it match the entire row by using a comma to match the first element as well.
The first grouping of one through four are simple applications of the technique. When we get to five we want to start using a pattern where the first line or two are larger pairs and the remainder of the images are in triplets. This pattern should repeat regardless of the number of images.
Here’s a commented example. Note that this might potentially be simplified using flexbox and wrapping, but that’s an exercise for the reader.
Let’s start with fifth, eighth, eleventh and the remainder of this pattern. Instead of using the :nth-child(1):nth-last-child(...) as we did before, we’ll use :nth-child(1):nth-last-child(3n+5). This will match the first element of a grouping of 5, 8, 11, …:
/* First two are half-sized (99% / 2) */
img:first-child:nth-last-child(3n+5) ~ img, img:first-child:nth-last-child(3n+5) {
	max-width: 49.5%;
	margin-right: 1%;
}

/* Last n - 2 are (98% / 3) */
img:first-child:nth-last-child(3n+5) + img ~ img {
	max-width: 32.6%;
	margin-right: 1%;
}

/* But second, fifth, eighth, ... have no right margin */
img:first-child:nth-last-child(3n+5) ~ img:nth-child(3n+2) {
	margin-right: 0;
}
Six, nine, and twelve are much simpler.
/* Six, nine, twelve, ... are all (98% / 3) */
img:first-child:nth-last-child(3n+6) ~ img, img:first-child:nth-last-child(3n+6) {
	max-width: 32.6%;
	margin-right: 1%;
}

/* Every third one of these has no right margin. */
img:first-child:nth-last-child(3n+6) ~ img:nth-child(3n) {
	margin-right: 0;
}
Seven, ten, thirteen, and the remainder of the pattern are similar to the 5/8/11 pattern:
/* First four are half-sized (99% / 2) */
img:first-child:nth-last-child(3n+7) ~ img, img:first-child:nth-last-child(3n+7) {
	max-width: 49.5%;
	margin-right: 1%;
}

/* Last n - 4 are (98% / 3) */
img:first-child:nth-last-child(3n+7) + img + img + img ~ img {
	max-width: 32.6%;
	margin-right: 1%;
}

/* The second and fourth, seventh, tenth, ... have no right margin */
img:first-child:nth-last-child(3n+7) + img,
	img:first-child:nth-last-child(3n+7) ~ img:nth-child(3n+4) {
	margin-right: 0;
	outline: 1px solid red;
}
Conclusions, notes, and further work
We can do some really interesting things making using of :nth-child and sibling selectors. The techniques in this post will also work for the related selectors :nth-of-type and :nth-last-of-type.
Browser performance doesn’t appear to be noticeably affected on mobile or desktop using this technique. If you plan on scaling this up it’s obviously something you’ll want to test.
If you were to combine this with flexbox and flex-wrap you might be able to simplify the example even further and might be able to handle images of different sizes more elegantly.
You also can also use this to create other interesting patterns, like matching only when the total number of children is even or odd, or other factor-based qualifiers.
I’d love to hear of any ideas or improvements you might have. Play around with the JSFiddle here.
Thanks to Webucator for creating a video for this post as part of their CSS3 training course series:
Comments? Follow me on Twitter @mmastrac and let me know.
]]><![CDATA[Welcome to the new grack.com]]>2015-01-08T00:00:00+00:00https://grack.com/blog/2015/01/08/welcome-to-the-new-grack-comI’m now on my fifth – though I’m sure not my last – iteration of blog management, Jekyll. It’s a slick static site generator and from what I can tell, the most popular.
One of the benefits of a static site generation tool is that you can aggressively cache the content. For that I’ve thrown Cloudflare in front of everything and have it both caching and optimizing all of my assets.
As part of the re-launch I wanted to offer some basic site search. I looked into a few options for static search in pure Javascript, but the most convenient turned out to be Swiftype which was not much more work than clicking a switch on Cloudflare’s app page.
While I was somewhat happy on Wordpress, my biggest issue with it was that everything lived in a database rather than source control, and that it required constant attention updating it for each release. I spent nearly five years on the platform, however, which puts it at the longest I’ve stayed on any one tool.
Obviously, publishing posts with static site generators isn’t quite as convenient. For that I’m making use of Travis CI and a private GitHub repo. It runs linklint over everything, then pushes it out to the static host via rsync.
]]><![CDATA[The Next Decade: part 2]]>2014-12-06T00:00:00+00:00https://grack.com/blog/2014/12/06/the-next-decade-part-2Five years ago I wrote a set of predictions about 2020. In some ways I think I was too unambitious for the progress of technology: browser technology has probably already reached the levels I had expected for a decade later. Some of them look like they might be off-target, like the increase in storage capacity of mobile devices. We still have another five years to see how they all pan out.
I thought I’d take another swing at a set of predictions. This time I’m looking out towards 2025.
Manufacturing
3D printing is the next major transformative technology wave. In 2025 we’ll be seeing 3D printers in the homes of at least a quarter of North Americans. Home 3D printer quality in 2025 will be amazing. A consumer will be able to print in multiple colors and plastic/rubber-like materials, with a final print quality that will often rival that of mold-formed products.
There will be multiple marketplaces for things to print: some open-source ones that will contain basic shapes and designs, and a number of licensed repositories for printing designer items like toys and kitchenware from well-known names. There will also be a healthy 3D piracy community.
When you look around a room in 2014, a lot of what you see will be printed in the home or a rapid-manufacturing facility in 2025. 3D printing will eat the manufacturing lifecycle from the bottom up. Products where the first 100 might be built with rapid prototyping today will have the first 100,000 produced on-demand. Companies like IKEA will choose to print and cut their designs on-demand in warehouses rather than stocking parts built elsewhere.
Local distribution centers will replace overseas manufacturing almost completely. North America will import processed materials from China, India and Africa for use in the new local centers: plastics and rubbers, and metals with binder. The local manufacturing centers will use a combination of 3D printer, laser/plasma cutting and generic robot assembly to build everything from one-off orders to runs of thousands as needed.
To support rapid manufacturing at these levels, generic robotics will replace the manufacturing line of today. A generic robot will be able to be taught to do a task like a human does and will coordinate with other generic robots to build a product like a fixed line would do today. Generic robotics will also find itself at home in other fields currently employing humans doing repetitive tasks like food preparation, laundry and cleaning.
Amusingly 3D printers will be displacing regular document printers which will have mostly died out at that point. Paper will take much longer than 2025 to replace, but the majority of financial, legal and educational work will be entirely electronic. Electronic signatures will be commonplace and some form of e-signature using mobile devices and biometrics will likely be used to validate documents. Paper in the home will be well on its way out and even children will be coloring on electronic devices with a stylus rather than coloring books.
Home
In 2025 we’ll have maxed out our technologies for 2D display and audio. Screens on cheap devices will have the same effective DPI as paper and the pixel will be something very few people will see. Virtual reality won’t be pervasive yet, but it’ll be in a significant number of homes for entertainment purposes. There will be devices small enough for portable use.
The convergence of devices will continue, and will consume a number of devices for entertainment at home. The cable box and dedicated game consoles will be almost dead, replaced with streaming from personal devices Chromecast-style. TV will still be going strong and there will be advancements in display technology that will allow basic 3D technology without glasses using light-field manipulation.
Transport
Vehicles will be radically transformed by advances in self-driving technology. While we still won’t have pervasive self-driving vehicles, there will be a large number of autonomous vehicles on the road. These will mainly replace long-haul trucking and transport, but some higher-end vehicles will be autonomous enough to allow individuals to safely commute to work or run errands hands-free.
Car ownership will be dramatically declining by 2025. With the ability to summon transport from an autonomous or human-driven vehicle at the tip of everyone’s fingertips, it won’t make sense for most people to own vehicles. High-end cars will continue to be a status symbol, but the low-end market will be decimated in the transition.
Electric vehicles will have captured around half of the market of vehicles sold, including everything from passenger cars to transport trucks. Fossil fuels and hydrogen will be included as “backup” options on some models, used only to increase range if needed by charging the batteries.
Energy
With solar getting cheaper and more efficient year-by-year, we’ll see some changes in the way that energy is supplied to home. Neighborhood grids will replace nation-wide grids for home use. Dozens of houses will pool their solar power into a cooperative with battery storage that they’ll use for electricity, heating and charging of vehicles.
More nuclear power will come online in the 2020’s, mainly driven by new reactor designs that produce very little waste and advances in fail-safe technology. Thorium-based reactors will be just starting to appear and safe designs like the CANDU plant will become significantly more popular.
Much of the new power brought online will be fueling desalinization and water-reclamation facilities to stabilize the fresh water supply. Fresh water will dominate the news cycle as energy does today.
Conclusion
With all of the changes described above, North America will see a significant effect on the number of low-end jobs. Manufacturing, food and transport industries will be radically changed, jobs moving from many low-skilled positions to a few high-end positions.
This will require thought on how we can re-architect the economy. I think we’ll see concepts like minimum guaranteed income replacing welfare and minimum wage. This is much more difficult to predict than the pace of technology, but we’ll have to do something to ensure that everyone is able to live in the new world we’re building.
]]><![CDATA[Colossal Cave Adventure]]>2012-08-13T00:00:00+00:00https://grack.com/blog/2012/08/13/colossal-cave-adventureThis is a fun little project I’ve been working on: a port of the Colossal Cave Adventure to the web. The monitor itself is nearly 100% CSS (with the exception of one image for the masking tape/signature and the diffuse reflection of the background).
The interpreter is all Java and compiled to JS via GWT. It can save its state to localStorage right now when you save in-game (although I’d like to automatically persist the state of the engine continuously before I release it).
And, FWIW, the Colossal Cave Adventure is a surprisingly hard game.
]]><![CDATA[On Google Chromebooks]]>2012-05-30T00:00:00+00:00https://grack.com/blog/2012/05/30/on-google-chromebooksThis is a follow-up to my week with a ChromeOS netbook post.
The Google Chromebook is an interesting product to watch. I’ve been a fan of and using them since the early Cr-48 days. In fact, two Chromebook laptops were in service in our household until just a few weeks ago when the Samsung Chromebook broke (although I hope to repair it soon).
These laptops sit next to our couch in a stack as a set of floater laptops we use for random surfing. If any of us are just looking for a quick bite of information, we generally pull out the Chromebook rather than walking over to the Macbook that sits on our kitchen counter. The Chromebook is also great for our son to use when building LEGO from PDF instructions.
Browsing is far better on the Chromebook than it is on any Android or iOS device I’ve used, hands down. I find the browsing experience to be frustrating on an iPad or my Galaxy 10”, while the Chromebook experience is flawless. The device is basically ready-to-use for browsing as soon as you lift the lid, in contrast to the fair amount of time it takes to get logged into the Macbook (especially if another user has a few applications open in their session).
The hardware itself in the early models was slightly underpowered, but that doesn’t really seem to matter much unless you’re playing a particularly intensive Flash video or HTML5 game. Scrolling is fairly slow on complex sites like Google+ as well, but it’s never been a showstopper. The touchpads have also been hit-and-miss in the early models. For what we use it for, the hardware is pretty decent. I imagine that the next generations will gradually improve on these shortcomings.
What makes these devices a hard sell is the price point. The cheapest Chromebook experience you can get today is the Acer (@ $300). Considering the fact that you are buying a piece of hardware that effectively does less than a laptop, I would find it hard to justify spending that amount if I were looking at hardware today. Even though I prefer to use the Chromebook when surfing over the tablets or the full laptop, I feel like the cost is just too much for a single-purpose device like this.
For Chromebooks to really take off in the home market, I think that a device with the equivalent power to the Samsung Chromebook 5 needs to be on the market at a $199 price point. I could see myself buying them without a second thought at that price. Alternatively, if we saw some sort of Android hybrid integration with the Chromebook, I think that this could radically change the equation and add significant perceived value to the device.
I don’t see the Chromebox being popular in households ever - I believe that we’ll see the decline of the non-portable computer going forward at home. Now, if I were running a business where a large subset of employees could get by with just web access, I would definitely consider rolling these out. The Chromebox looks like it could be a real game changer for business IT costs.
]]><![CDATA[Upcoming Google+ features: hashtag autocomplete, new circle management, and more]]>2011-11-11T00:00:00+00:00https://grack.com/blog/2011/11/11/upcoming-google-features-hashtag-autocomplete-new-circle-management-and-moreI’ve been snooping around the Google+ code a bit and found some more upcoming features.
Hashtags are getting a bit of a boost with auto-completion. When you type the hash character, you’ll see a list of potential auto-completions (this doesn’t appear to be hooked up to any data). When you hit space, it turns into a blue block containing the hashtag, which acts like the blue blocks that contain + mentions:
Circle management looks like it might be dropping the circle visual metaphor. The new interface lists your circles on the left, although this wasn’t working very well, so it’s difficult to say what the final result will look like:
The new interface contains two menus: one replaces the existing Relevance drop-down, while the other contains some interesting new menu items. Increase and decrease circle size appear to change the size of the circles on the circle management page. Might be an internal option for the user experience team to eyeball the correct sizing:
There’s a new “more” dropdown on a profile page that doesn’t seem to do anything, and games may appear in the right sidebar:
Photos are getting some tweaks. The photo previews are appearing larger in the photos tab, and there’s a new “Link to this photo” option:
There’s a new “Recommendations” link on the left side of your home screen that links to a page that doesn’t exist yet. Clicking on the Recommendations link takes you to a 404 page at http://plus.google.com/plusones/posts.
You can now control who can post on your public posts. This might be useful for celebrities, although I’m not really sure who it’s targeted at:
Individual posts are now getting a “Hangout” button. Discuss a post in real-time with others that have seen it!
You can now mute a person in addition to a single post, and the post sharing dropdown is getting a bit of a makeover with item icons:
I’m not sure if this welcome page was already there, but I haven’t seen this screen before:
]]><![CDATA[Five minutes with the Kobo Vox]]>2011-11-05T00:00:00+00:00https://grack.com/blog/2011/11/05/five-minutes-with-the-kobo-voxToday I had a chance to play with the Canadian equivalent of the Kindle Fire, the Kobo Vox. It’s an Android 2.3 device, which means that it effectively has access to the entire ecosystem of Android apps. What it lacks, unfortunately, is the official Google Market application. It did appear to have access to the Gmail app, which makes the lack of Google’s Android market surprising.
The Vox is a bit lackluster in the graphics department. Full-screen animations like zooms and fades are choppy: 5-10 frames per second. The same animations in the Kobo application on my Galaxy Tab 10 are fluid and smooth. This makes the Kobo Vox feel like a really cheap bit of hardware. It’s not a big deal while reading books in the Kobo application: paging is lightning fast, although it doesn’t have any sort of animation to indicate page flips.
One thing you get with the Vox that you won’t get with the plain Kobo application on other devices is the “Kobo Voice” social reading experience. You can annotate passages in books and share them with other readers. I don’t find this to be a big loss. The Vox also offers a way to lay out books in two-page landscape mode, which would be amazing on the Galaxy Tab 10, but feels a bit cramped on the smaller Vox screen.
The Kobo Vox does have a nice screen. The Dell Streak 7” tablet has issues with narrow viewing angles in portrait mode. From what I could tell, the Vox was beautiful in portrait and landscape orientation. The quality of the display feels pretty good.
Based on the five minutes I played with it, I don’t think it’s worth me buying. I’m tempted to look at the Kindle Fire for use in Canada, but I suspect that Amazon’s less-than-perfect support for Amazon services in Canada will make it less of an interesting piece of hardware. If you don’t already have a tablet, however, this might not be a bad device to purchase.
Comparable devices:
Kindle Fire: $200
Kobo Vox: $200
Dell Streak 7”: $399 (terrible for reading in portrait!)
Galaxy Tab 8.9: $400-600 (couldn’t find it for sale in Canada)
Galaxy Tab 10.1: $649
]]><![CDATA[Google +1 Chrome extension tracks your https traffic]]>2011-11-03T00:00:00+00:00https://grack.com/blog/2011/11/03/google-1-extension-tracks-your-https-trafficEDIT: In a response to this post on Google+, Louis Gray says that he’s notified the team. I’ll update this post as I get more information.
The Google +1 extension for the Chrome browser sends an RPC event to Google for every page you visit, https or not.
I hate to be a downer on cool stuff like this, but I really don’t think this is acceptable. It’s even sending the querystring, which could potentially contain a secure session token. All of the communication to the Google servers happens over https, but I don’t think that excuses this. https:// traffic needs to be off-limits for auto-tracking like this.
I’d be OK if the button allowed you to disable auto-reporting of the current +1 count (this can default to ‘on’), and added a default-off option to show +1 counts for https sites.
Below is a screenshot of the RPC request sent to Google’s RPC endpoint, showing the https URL of a bank’s login URL, complete with query-string.
]]><![CDATA[Automatic file transfer in iTerm2 via ZModem]]>2011-10-26T00:00:00+00:00https://grack.com/blog/2011/10/26/automatic-file-transfer-in-iterm2-via-zmodemscp is a great way to securely transfer files from computer to computer, but wouldn’t it be nice if you could just automatically send files over the existing SSH connection you’ve already opened?
Back in the days of modem-based BBSes and dial-up machine access, file transfers were forced to run over the same TTY as your interaction with the system. A number of different solutions evolved for this, starting with the grandfather of transfer solutions, XModem. Other transfer protocols evolved, some starting from the ground up like Kermit, while YModem and ZModem build on the foundation of XModem.
The latest version of iTerm 2 added support for two features that were very interesting: Triggers, that match a regular expression to a line of text; and co-processes, that can feed input directly into a terminal. With these two features, we can add the ability to stream files to and from any server over an existing ssh session. As ZModem is most modern protocol with wide support (lrzsz is well-supported and packaged on both OSX and Linux), I’ll show you how to use it to automate piggy-backed file uploads and downloads in your iTerm sessions.
Setup
First of all, install lrzsz via brew. This will install the sz and rz binaries in /usr/local/bin/:
macbook-pro-2:~ matthew$ brew install lrzsz
==> Downloading http://www.ohse.de/uwe/releases/lrzsz-0.12.20.tar.gz
==> ./configure --prefix=/usr/local/Cellar/lrzsz/0.12.20 --mandir=/usr/local/Cellar/lrzsz/0.12.20/share/man
==> make
==> make install
/usr/local/Cellar/lrzsz/0.12.20: 13 files, 376K, built in 21 seconds
Next, we’ll add a Trigger to your iTerm 2 profile that will trigger on the signature of the rz and sz commands. The setup for these commands differs based on the iTerm 2 version you have:
Build newer than 1.0.0.20111026
Regular expression: \*\*B0100
    Action: Run Coprocess
    Parameters: /usr/local/bin/iterm2-send-zmodem.sh

    Regular expression: \*\*B00000000000000
    Action: Run Coprocess
    Parameters: /usr/local/bin/iterm2-recv-zmodem.sh
Build older than 1.0.0.20111026 (only receive supported)
Regular expression: [\$#] rz( -v)?$
    Action: Run Coprocess
    Parameters: /usr/local/bin/iterm2-send-zmodem.sh
Note: ideally we’d be matching on the ZModem initial packet signature: \*\*\u0018B01 in all versions of iTerm 2, but earlier versions of iTerm 2 had a bug that broke this pattern detection in this case. Instead we’re matching against the pattern of the rz command typed at a shell for those older builds.
Receiving files from the server
To receive a file on your server, type the following at a shell prompt:
# rz
A file-picker dialog will then pop up asking you for the file to send. Once you choose the file to send, it will automatically transfer the file across your existing console session.
Sending files to the server
To send files from your server to your desktop, type the following:
# sz file1 file2 file3 /folder/file*
A folder picker will show up, asking where you want to drop the files. If you send multiple files, they will all appear in this folder.
Wrap-up
This is a pretty rough first pass at this, but the shell scripts are available on github if you’ve got ideas for improvement.
]]><![CDATA[On the advancement of science and the useful arts]]>2011-08-24T00:00:00+00:00https://grack.com/blog/2011/08/24/on-the-advancement-of-science-and-the-useful-artsApple is quickly burning my goodwill towards with these silly patent fights. Two out of three of the patents were found not to be infringing, while the last one is a software patent that basically describes the functioning of a mobile device that deals with photos.
At this point, it’s probably worth pointing out that Apple’s notification bar is pretty much a rip-off of the Android one. And you know what? I really don’t care.
Companies should be riffing off each other’s designs and improving them as they do. We’ll get a lot further than if we give one company total control over a single domain. Apple has taken the Android notification bar and improved it, just as Google has done with various iPhone features. Both companies have built their mobile operating systems on the prior art of thousands of other inventions from the last thirty years.
As many people have stated, patents are a monopoly to advance science and the useful arts. They are not a monopoly to advance the profits of any given company, though that may be a side-effect of their existence.
Copyright and trademark law already exist to prevent direct copying of design. Would Apple have released the iPhone in the absence of software patents? Very likely. Would the iPhone/Android rivalry shaped up the same way without software patents? Very likely.
In their current form, software patents have been hindering the progress of computing. With that in mind, I say it’s time for them to go.